10. Silver Gelatin P.O.P. Collaborative Research Project — Recipe #2: Baker 1941, version 1 |
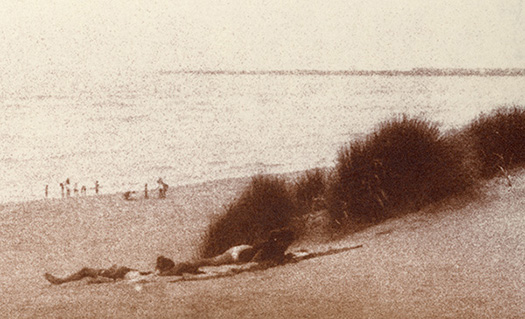
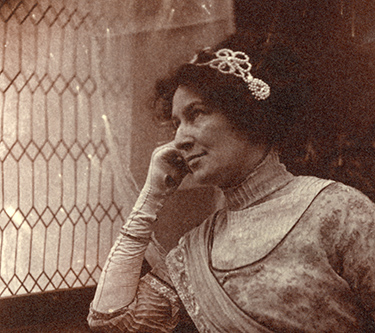
Recipe #2: From Photographic Emulsion Technique, 1st edition, T. Thorne Baker, 1941 This recipe is an adaption of the recipe from "Reading #2" on page 7 of this project. It's hard to know what to call emulsions which are unnamed in the literature. "TLF P.O.P. #2: Baker 1941, Version 1" seems as good as anything. If you modify this recipe significantly, please add your name to the end of the TLF title, so that we can trace the history of adaptations. Left: Contact print made with an inkjet negative printed on vellum drafting paper. Non-UV light source (see page 8 of this project). Original image: handmade 35mm negative. |
|
"TLF P.O.P. #2: BAKER 1941, Version 1" This recipe requires bringing two solutions to 40°C. It can be mixed by hand or with a magnetic stirrer, so there is flexibility for equipment. You can heat both solutions in a single waterbath and then mix them together by either method, or use two separate waterbaths, one of which is a stirring hot plate. I reduced the amounts given by Baker by a fifth. This brought down the amount of ammonium chloride and sodium potassium tartrate to very small quantities. Small weights increase the potential margin for error. Far better to weigh out more, make a solution, and take the appropriate fraction of that. Remember to reduce the amount of water originally called for by the amount of the solutions you are adding. |
|
INGREDIENTS Solution A In a 250 ml beaker, or equivalent, combine the water and the solutions: Water (distilled) ..... 130 ml Ammonium chloride ..... 0.5 g (dissolve 2 g in 40 ml water) Sodium potassium tartrate ("Rochelle salts") ..... 1.0 g (dissolve 2 g in 20 ml water) Stir in: Gelatin ..... 16 g Allow the gelatin to bloom 30 minutes, then place the beaker in a 40°C waterbath until the gelatin is melted and the solution reaches the temperature of the waterbath. Solution B In a beaker, or equivalent, that can hold the volume and have its rim above the level of your waterbath, combine and dissolve Silver nitrate ..... 5 g Citric acid ..... 2 g Water (distilled) ..... 50 ml Place in a 40°C waterbath until the solution reaches the temperature of the waterbath. With steady stirring, add Solution B to Solution A in a slow stream. Continue stirring for 2 minutes. Ripen in the 40°C waterbath, without stirring, for 10 minutes. Add with slow stirring, Everclear (ethanol) ..... 10 ml 2.5% chrome alum ..... 4 ml Immediately pour the emulsion through a fine filter into a clean 250 ml beaker (I favor the Keurig K-cup filters, but "gold" coffee filters also work well.) Place the beaker in a room temperature waterbath and gently stir with a clean plastic spoon until the emulsion reaches coating temperature, which at normal room temperature should be 35-36°C. This recipe coats covers 650-700 square inches of emulsion. I coated five sheets of Arches 90 lb HP paper with an emulsion path of 5 inches by about 28 inches. I used a 5-inch glass coating rod (aka "puddle pusher"). A 5-inch path allows for both 4"x 5" and |
|
Variations: • Increase the amount of citric acid to increase contrast (How much increase and what is the limit? Does decreasing the citric acid decrease contrast or ruing the emulsion?). • Substitution of ammonium citrate for the sodium potassium tartrate tends to give fuller half-tones (according to Baker; (Note: I'm not sure what a "fuller half-tone" looks like; looking forward to finding out). • Addition of 10 g of fine rice starch, ground into a paste with a little water, will matte the paper. (Baker says this is best coated on glossy baryta paper.) Additional possible variations/??'s: • Increase the ripening time? • Increase the temperature? Note: Baker says to coat the emulsion immediately, without cooling it. The emulsion is already very thin. Under safelight, it looks more like tapioca milk than top cream. At 40°C it was as thin as water. I couldn't bring myself to coat with it like that, so I cooled it down to the temperature I usually coat at. It was still thin, but it behaved very well. A consequence of the thin emulsion is that the paper has an almost matte surface. NOTE(11/15/2020): On the following page, I modified the recipe a bit and I think I prefer it — work-in-progress. |
|
|
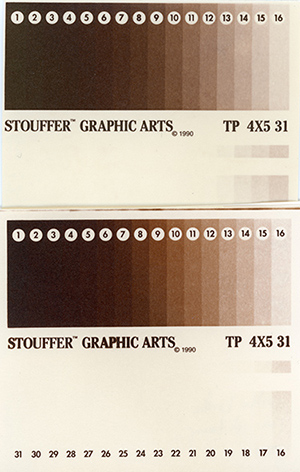
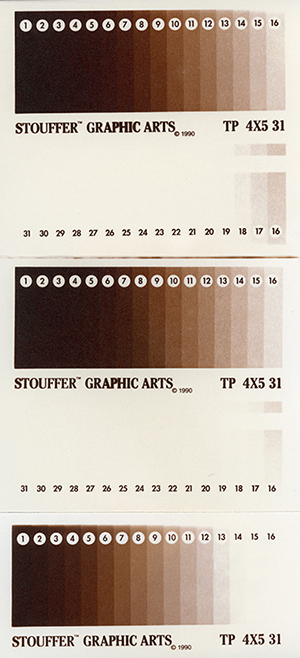
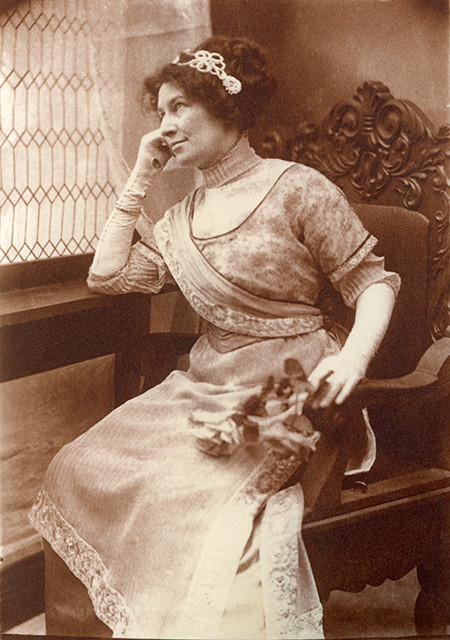
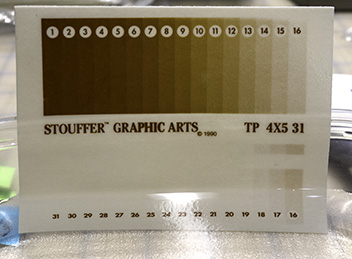
Comparison with Recipe #1 On the top, recipe #1. On the bottom, #2, version 1. Recipe #2 is a slightly cooler color temperature (bluish/purple), especially in the lighter values, but in my opinion the colors are close enough to mix up in one portfolio. The differences in contrast give some flexibility when contact printing negatives. Recipe #2 requires about half again more exposure (with the non-UV light panels). I haven't tested with a UV light source. Below left: Exposures at 120 minutes, 90 minutes, and 60 minutes. Below right: Placing the exposure to preserve detail in the chair meant losing detail in left hand glove. There is minimal negative detail in the glove, so I prioritized the chair. The paper was especially easy to spot with retouching dyes. The print of our lady in her chair is retouched only with dyes. No Photoshop. At 100% pixels, the spotting is visible, but it is undetectable in the real world. I used Marshalls Photo Retouch dyes basic violet, Verona brown, and burnt sienna. If a retouched area gets too purple, primary yellow is handy to have to complement the color down. Be sure to keep your brush almost dry. Wet POP paper is a very different color than dry. |
|
|
|
|
|
|
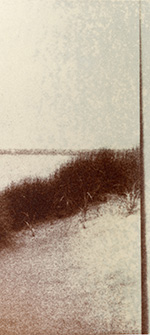
Below left: An exposed print before processing. 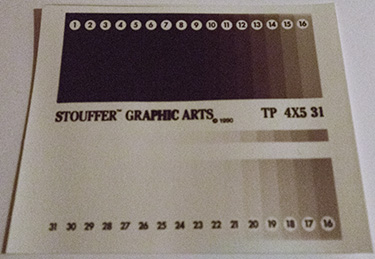
|
|
|
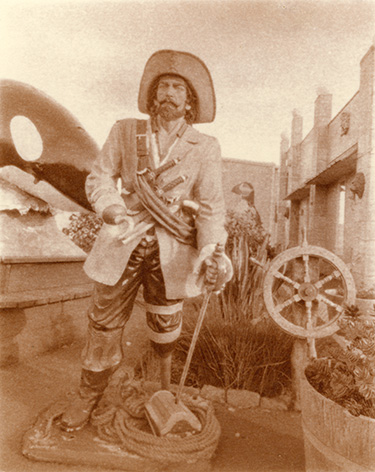
I think this emulsion is too contrasty to print the lady in her chair perfectly. However, it fits the Aquarium Village Pirate. He was a little flat with Recipe #1. As with the lady, this print is untoned. After exposure, it went into a plain hypo bath, with gentle agitation, for five minutes. This is repeated with fresh hypo. All processing is one-shot, so a print stays in the same tray from beginning to end. This means that the darkroom space required is very minimal. A small bathroom can be pressed into service for just 10 minutes. After development/fixing, the print can be washed in room light. If printing is done with small non-UV light panels, the printing lights can be out in a living space; protective googles not required. The only time extra room is needed is when the paper is being coated and dried. |
|
|
Troubleshooting Off and on over the years, I've had trouble with the Arches 90 lb paper. I think the problem is in the sizing. After a long time in the water, the paper gets blotches. These remain even after the paper is dry. I'll do a more extensive investigation of this soon. By every other metric, I love this paper for POP so it's worth it to me to try to find a solution. Clerc says in his book that his toners should be used freshly made (minus two hours "ripening.") I toned a lady print (it was too dark, so fair game!) with two week old Clerc toner II. The print was ruined by bleached comets. I'll return to that, too. |
|
For now, recognize that the beached/blotchy thing that Arches can have going on is the paper, not you. And word to the wise, make only enough Clerc toner for one session's work. |
|
|
| < Recipe #1 - p.3 Contrast Control by Light Source > |