9. KCl Gaslight Paper—The Recipe |


|
|
"A homemade CHLORIDE EMULSION", PYREX MEASURING CUP and WHISK METHOD, Expanded Form |
|
Tools & Materials In addition to the standard darkroom paraphernalia, including a scale, timer, and thermometer(s):
To the best your space allows, stage all the components for both the emulsion making and the paper coating. Weigh out the chemistry, line up the tools in the order you'll use them, and have the watercolor paper and glass coating surface(s) ready, along with space to set the glass and coated paper to dry. PREPARATION Salted Gelatin In the 1-cup Pyrex cup, dissolve together
When dissolved, slowly and thoroughly stir in
Cover the container with a piece of plastic wrap or a plastic lid. Let it sit for 30 minutes to several hours to bloom (soak and swell) the gelatin with as much water as it can hold). Fill the 2-cup Pyrex with very warm water and over a sink or tray to catch the overflow water, carefully set in the 1-cup Pyrex with the salted gelatin. Place the Pyrex stack on your heating unit or in a larger container of water preheated to 49–52°C/120–125°F. Poke an impeccably clean thermometer through the plastic wrap into the salted gelatin. When the salted gelatin is melted and has reached 49–51°C/~122°F, you will be ready to add the silver (i.e., the "precipitation" step). Silver solution In the meantime, dissolve together
CAUTION: At all times when handling silver nitrate, be very careful. Silver nitrate is a powerful oxidizer and stains anything organic it comes in contact with. If you get stains on your skin they cannot be washed off. They will be part of your skin for weeks. If you get silver nitrate in your eyes, the damage could be blinding. Don't be afraid, just be careful. Silver nitrate is no more hazardous than many common household cleaning chemicals. Bleach and drain cleaner come readily to mind. On a happier note, there are no hazardous fumes involved with a plain silver nitrate solution. PRECIPITATION (a.k.a. "emulsification") Where you are at now: The salted gelatin is holding at 49–51°C. The silver nitrate solution is ready and sitting safely within easy reach of your waterbath stack. As is the stainless steel whisk. Have a timer within reach and sight. Set it to be ready to start a 5 minute countdown or count-up. Have boiling water handy. Turn off the room light and turn on the safelight. Start the timer. Immediately start whisking the salted gelatin in one direction. When you have a good rhythm going, pour in about 1/3 of the silver solution, whisking continuously. Whisk for 1 minute. Pour in another 1/3 of the silver, whisking continuously for a minute. Pour in the remaining silver solution and continue whisking until the end to the 5 minutes. (When I have the time to learn how to add captions to videos, I will indicate that a minute has gone by between additions. For now, bear that in mind as you watch.) Cover the 1-cup Pyrex tightly with plastic wrap and set the waterbath stack in your kitchen pot. Pour in enough almost boiling water so that the water comes half way up the side of the 2-cup Pyrex. Be careful to keep the water from falling on the plastic wrap. Cover the pot with its lid. The emulsion is now in its ripening stage. TIP: Rinse the whisk immediately after use. Silver nitrate is very corrosive to cheap stainless steel. If you see any rust forming on your whisk, you should replace it. Emulsion doesn't like rust. You can mix emulsion with a plastic spoon. You just have to practice getting a good rotation going in the melted gelatin. |
|
Version #2: Precipitation using a magnetic stirring hot plate. |
|
RIPENING Let the emulsion sit for the time it takes you to set up for coating. This should be about 30 minutes if you have your materials ready to go. PAPER COATING Have the darkroom staged for coating: level surface(s) for lining up glass sheets, an area with good safelight illumination for coating paper—with space next to it to set the emulsion, and to rinse and dry the puddle pusher between coatings. Prep the paper for wet coating and line up the sheets in the darkroom. Have the puddle pushers ready. Have a 40–41°C preheated heating surface within easy reach of the coating area. This is to hold the emulsion in a coating-temperature waterbath. (Of course, at all times be aware of the hazards of electricity and water.) Also close at hand: the pan for rinsing the puddle pusher between coatings, and clean, dry towels. Turn off the room light and GO TO SAFELIGHT. Take the Pyrex cup with the emulsion out of the waterbath Pyrex. Set the waterbath Pyrex (with its water) on a 40–42°C heat source. Set the Pyrex with the emulsion back in the 2-cup Pyrex with 40°C water. Half Recipe Variation: For whatever reason, but probably because your darkroom space is limited, you can divide the recipe into two parts. After the ripening step, pour half the emulsion into a beaker or jar that can be covered with plastic wrap tightly secured with a rubber band. Put the beaker/jar into a lightproof container. Refrigerate (NOT freeze) until you are ready to coat again (up to one week's time). Under safelight, remove the jar of emulsion from the lightproof container. Set it in a waterbath pre-heated to 50–51°C. Let it sit until the emulsion is just completely melted (don't stir during melting.) You will need some trial and error to determine how long the melting takes and therefore when you should start getting your paper ready to coat. Alternatively, you can refrigerate the emulsion (two halves or the full recipe) before ripening and re-melt a jar at 50°C, then cool it from 50°C down to 40°C for coating. This allows you the option of making the emulsion one day and coating half or all of it on another. Coat the paper. (50–55 ml/ < ¼ cup emulsion per 11"x 15" sheet of paper, coated with a 9" puddle pusher.) Dry the sheets in the dark. Store the dry paper in lightproof conditions. Do not expose a sheet of paper to room light until it has been thoroughly fixed out. PROCESSING There is enough excellent information on developing, fixing, and washing prints, that I won't go into it here and now. Ansel Adams' original series of books is invaluable. I personally favor a simple work flow. I make sure I leave a print in the developer for 2½-3 minutes. I expose accordingly. Although you can see the image come up in the developer, put your hands in your pockets if that's what it takes to resist snatching a print before it has had a chance to fully develop. Over-expose and under-develop doesn't work for paper. I use a dilute stop bath for a minute before fixing. I use a 2-step fixing protocol — three minutes in each of two separate fixing baths. In the following printing session, fix #2 becomes fix #1, with a new fix #2. I wash by still water diffusion—six separate trays of water that each print rotates through at about 10 minutes/tray. That turns out to be the time each subsequent print moves though the process. When I am washing prints with hardened emulsion, or emulsion coated on heavy watercolor paper, I use a commercial hypo-clear formula as per instructions. For portfolio work, I almost always lightly selenium tone. I don't do that for emulsion testing because I want a record of an emulsion's true color. |
|
Negtives for KCl Gaslight Paper 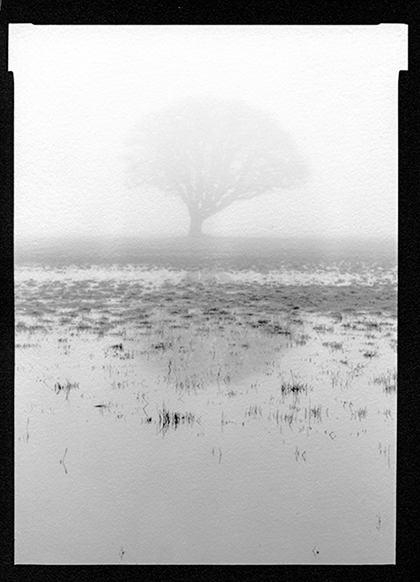
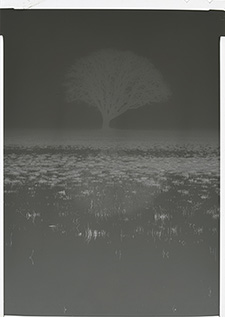
Yggdrasill Far left: A KCl gaslight paper contact print of 5"x 7" commercial film. Left: The negative, developed in XTol and its positive from a flatbed scan. |

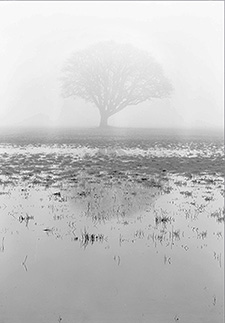
Endurance A KCl gaslight paper contact print of 5"x 7" commercial film developed in a staining pyro developer. |
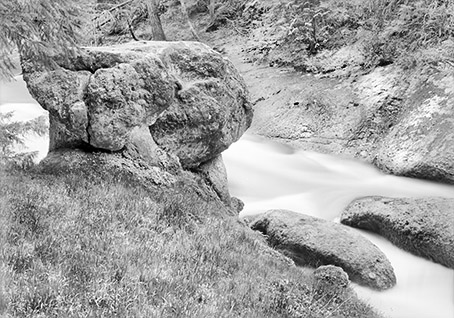
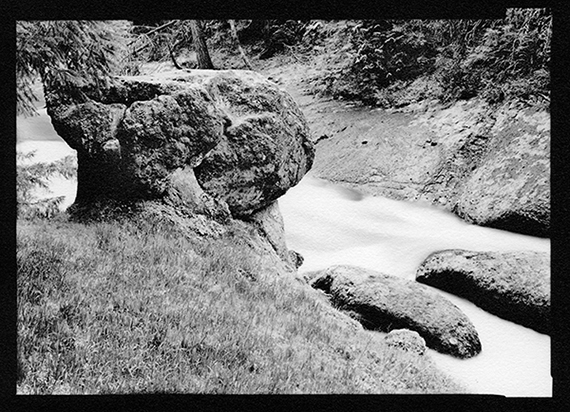
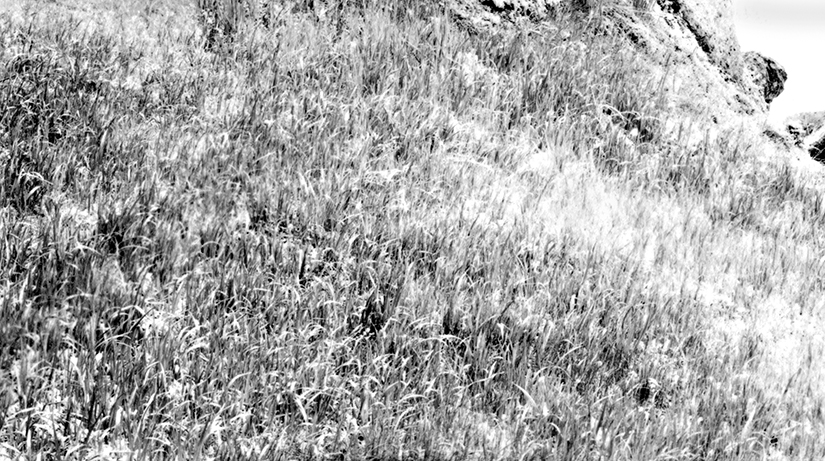
Except for the color difference, these two negatives are very similar in density. But, the color makes all the difference. KCl emulsion is colorblind. That means the yellow pyro staining acts like a very strong filter. The Yggdrasill print was made in 20 seconds with a sheet of Yupo. The Endurance print took 2½ minutes without Yupo. And, it's not just a matter of speed. The KCl paper drew out all the detail the non-stained negative. When I hold the Yggdrasill print up to the screen next to the positive from the scanned negative, all the information is there, including the sense of luminance. The pyro negative print, on the other hand, has a bit of "chalk & charcoal" to it. You can see the detail that was lost when you compare it to a positive scan of the negative. It would certainly be easy enough to contact print the negative with a contrast control mask. And, it might be worth it to try. The detail rendered in the grass is beautiful—both the blades that were still and those that were whipped to a froth by the wind. The water has a very nice glow. For the most part though, given a choice, it is always best to match negative with paper. Needless to say, that is a matter of personal taste. Below: Crop from the contact print. |
|
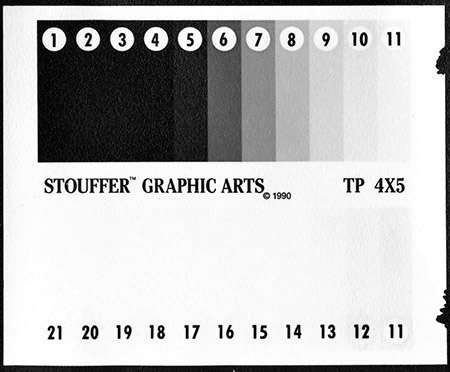
Here's a Stouffer of the paper developed in Photographers' Formulary BW65 at 1:1:4. Different developers will deliver slightly different results. The exact light source for your contact printing will affect the density range. There are variations on the basic recipe that can make a considerable difference in the final emulsion. But, for now, keep it simple and try to stick with one routine until you feel you can predict what's going to happen. There's plenty of time for experimentation in the future. |