14. Dry Plate—Glass
Glass—Plate Prep
There are so many different tools for working with glass, spanning so many price ranges, all within an internet search, that I happily leave tool selection to individual taste and circumstance. I use a Glastar Strip and Circle Cutter, a 3M Diamond Hand Pad (220 mesh/red), and Dick Blick glass, which they market as "Glass and Backing." On the face of it, the Blick glass is a bit more expensive than glass from a local shop, but I have never gotten a piece that had the slightest scratch. It comes impeccably clean. All four sides are smoothed to baby bottom perfection. I can get four 4"x 5" plates from an 8.5"x 11" sheet and only have to smooth two sides of each plate myself. Most importantly, it is 1/16 inch thick (1.5–1.6 mm); thin enough to fit in the old holders that won't accept standard 2 mm "picture framing" glass. My local glass shop has to special order 1/16 inch glass. It's expensive and comes in sheets too large to handle easily without breakage. I have decided that, for me, the Dick Blick glass is a bargain—something nice to remember is that plates are reusable if you take care not to scratch them. If you recycle all but the keepers, you probably won't be cutting as much glass as you might fear.
For cleaning info, go here.
You do need to carefully measure your plate holder(s) before you cut. Most holders take glass ⅛" narrower than the named dimensions of the format. A 4"x"5 plate is actually 3-7/8 x 4-7/8 inches. Plate holders smaller than 4x5 almost always need thin (1/16 inch) glass. 4x5 holders can run either way. I have some that take 2 mm glass, and others that only take thin glass. These are usually the older holders. Plate holders 5"x 7" and larger almost always accept 2 mm or even 2.5 mm glass. The exceptions to this are the old book-style holders. I have a number of them "half plate" size and larger, and they all only take thin glass.
If you are buying glass locally, the first time you go in take a holder with you to the shop (or holders, if you have a collection of different styles). They always have scraps and you'll be able to make sure a thickness of glass will fit under the hold-downs of your holder. Remember to account for the emulsion. It's not thick, but if you have to force a bare piece of glass into your holder, a plate plus emulsion isn't going to fit.
I usually devote a day or two, as needed, to just preparing plates—as many plates as possible. When I get done cutting, edge polishing, cleaning, and storing away each plate in its individual negative sleeve—the same sleeve/envelope that will hold the final dry plate negative—I feel rich. More importantly, a big hurdle to spontaneously deciding to coat a batch of plates is gone—at least for as long as my stash of blanks lasts.
Glass—Coating Prep
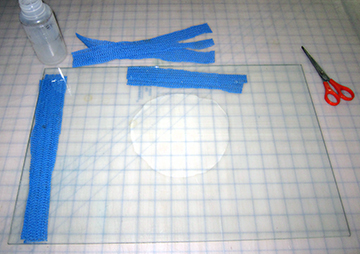
Very few things in emulsion making are absolutely essential, but having a dead level coating surface is absolutely essential. A spirit level will get you started, but it's not precise enough. The only way to know that the emulsion won't pool on one side of the plates is to test with a puddle of water. Keep making puddles and watching the direction the water wants to go, making adjustments to the glass sheet each time. When you can pour a puddle, and then pour more into it, and the puddle stays round as it gets bigger, you've got it. The final test will come when you start fixing your negatives. If one edge or corner takes far longer to clear than the rest of the plate, you know you have more leveling work to do next time.
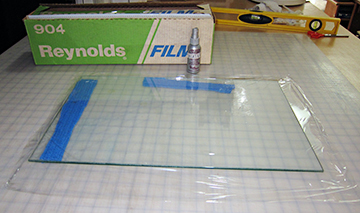
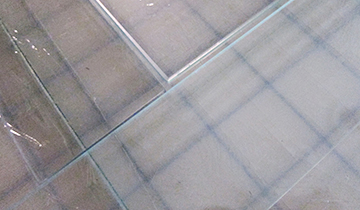
After your surface is level, cover it with a sheet or overlapping sheets of plastic wrap. I have used both household and restaurant varieties with equal success. Up until now, I have been advocating a silicone sheet, but silicone sheets are expensive and not easily available. "Inexpensive and easily available" is the mission of these tutorials. Plastic wrap actually has a virtue that silicone doesn't. There is no need to be careful when cutting the dried plates apart.
The trick is to first moisten the surface of the glass. The damp glass practically vacuum-seals the plastic wrap down. Give a few tugs to get most wrinkles out, but there's no need to be obsessive.
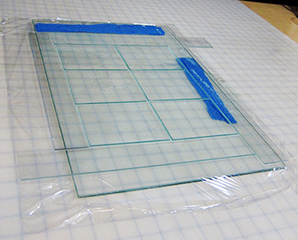
Next, moisten the plastic wrap just like you moistened the glass sheet under it, and arrange six plates and four dam bars. Leave a 1/16 to 1/8 inch gap between all the plates and the dam bars, but make sure the dam bars are up tight against each other. The dam bars do just what it sounds like&mdash they keep the emulsion on the plates. The tiny gaps around each individual plate allow the emulsion to flow over the edges. Never touch the glass plates without cotton or clean nitrile gloves. Clean plates are our friends.
Note the switch from silicone to plastic wrap and that for this tutorial I'm using the same glass sheets that you bought for wet paper coating in the gaslight paper tutorial.
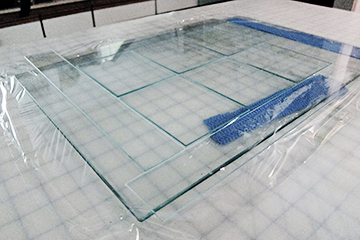
One AJ-12 recipe will coat ten to twelve 4"x 5" plates. I have found that four or six plates arranged together is about the maximum I can coat evenly. That's two sheets of six, or three sheets of four. I find it perhaps a little easier to coat a single file line, but that may be because I've practiced that so many more times. Practice really is magic.
Glass—Coating
I ran out of acrylic gesso, my favorite coating demo material. In order to keep the promise I made to myself to "use up some of the junk around here!!" I used thinned-down acrylic medium for the following demo. It does not spread as well as emulsion. I was considering reshooting the segment, but I realized that by accident the video demonstrates an important point. The idea is to get the right amount of emulsion down and spread out as quickly as possible. Emulsion sets up fast, so you really need to resist the temptation to re-work a plate. (Notice that I failed to take my own advice on one of the plates.) After you pour on a plate's worth (1 Tablespoon/15 ml) you'll need to spread it with the bottom of the tablespoon bowl. That's why having a round-bowled spoon is important. Under a safelight you can easily see any bubbles. Chase those to the edges. But, you've only got seconds before you have to stop and move on to the next plate. If there's a bubble caught between plates, leave it. All this is nowhere near as harrowing as it sounds. When you're working with real emulsion it all goes very smoothly. (Again, practice makes perfect.)
After the plates are dry or nearly dry, take a sharp blade and cut the emulsion between the plates and dam bars completely and cleanly. You never want to have to pull the plates apart. There will be a smear of wet emulsion on the bottom of the plates. Carefully prop the plates up a bit on something to allow the bottoms to dry. If the edges aren't completely dry, handle the plates with your fingertips on the bottom of the plate. When everything is completely dry, you can load your plates or store them in a paper safe.
[October 2018 update: There is more information about dry plates on page 4 of the home page slide show, Handmade Silver Gelatin Emulsions—A Review. Also, full instructions for making dry plates are in the book, "The Light Farm, Volume 1, The Basics," available to buy or read for free in Blurb preview. See the link at the top, right-hand side of the home page. An excellent technique of coating dry plates is covered here.]
TIPS: I live in a cool, damp climate. Even inside the house, the humidity is high. I would never get plates to dry without a little supplemental heat beyond normal house temperatures. I have a small room radiator I bring into the darkroom while the plates are drying, set to about 75°F.
Also, without getting obsessive, do what you can to avoid dust movement while the plates are wet. I have taped a piece of fabric over the air vent. The fabric is designed to keep kitchen garden plants warm on cold nights and to keep out insects. My local nursery sells it as "floating row cover." It does a fantastic job of keeping dust out of the darkroom without slowing down the air coming from the furnace ductwork.