5. Handmade Silver Gelatin Emulsions—Film |

|
|
FORMAT vs. FORMAT 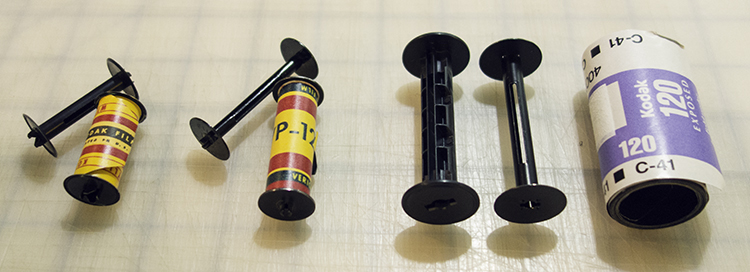
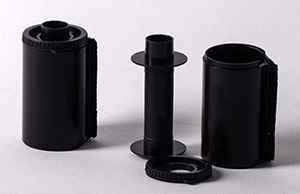
From the left: 828, 127, 120, and 620 film spools |
|
It is rather mind-boggling how many formats have existed since photography got started. Most people are surprised, especially if their experience has been limited to 35mm canisters. There is a lot of excellent internet reading on the subject. It's very interesting from a historical point of view, or if you want to be an informed Ebay shopper, but think of it as "extra credit" rather than required reading. One issue that can be confusing is the difference between film format and camera format. A camera that takes 120 film, which is People often have strong feelings about the best format, but if ever a topic were a matter of "each to his/her own," film format would be it. There is an objective issue, though—the wider the format, the fewer exposures from a roll of film. A 6x4.5 camera will get 15 or 16 exposures from a 120 roll. A 6x17 panorama camera will expose only four frames. As a practical matter, this can influence the decision about film emulsion choice. A small negative will be enlarged more than a larger one for a given print size. A slower emulsion will usually be finer grained, and therefore yield a less "grainy" print (if that is important to you). On the other hand, people often photograph with roll film cameras so that they walk around without a tripod—perhaps necessitating a "fast" film. (A fast lens, on the other hand, means it has a large maximum aperture allowing wide-open shooting, which in turn allows slower film and/or low light situations.) Obviously, there are no right or wrong choices—just the necessity of understanding the characteristics of the tools and materials and the related trade-offs as they pertain to your goals. |

One word of (hard-earned!) advice: Beware G.A.S. (Gear Acquisition Syndrome)—at least in the beginning. There are no magic bullets; no magic camera brands or soups of chemistry. But there will be magic. I'll always be pretty sure that what happens when a photon hits a silver halide crystal is Magic. Start with one or two cameras, preferably the ones you already own. Learn to make emulsions. Emulsion doesn't know Hasselblad from Holga. Learn to photograph with your emulsions. Practice, practice, practice. And read. And think. Imagine a circular staircase taking you higher with each loop. One year from now, you will be amazed at your progress. And, yes, you'll probably spend a little money (or a lot!) on Ebay, but it will be happy money and not groan money. |
|
The Docks. Newport, Oregon. |
|
|
|
MAKING A CUTTING GUIDE |
|
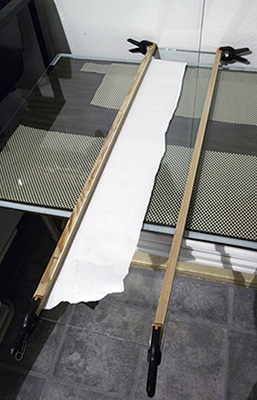
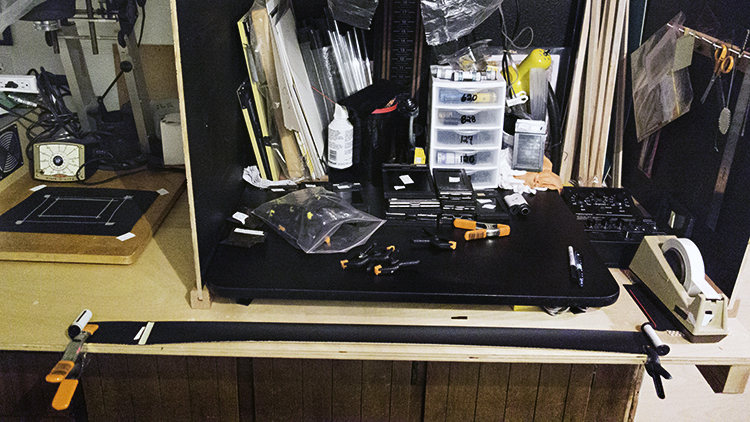
"Film" comes either as sheets or in rolls. Cutting sheet film is very straightforward. Determine the correct size for your film holders, cut, and load. The film is cut with a standard paper cutter. It might be useful to first practice with cutting and loading paper. Construction paper, or a similar weight paper, is perfect. Roll film is a bit more complex (just a bit!). The emulsion recipes and the coating techniques for sheet film and roll film are identical, but you can't cut roll film with a paper cutter. You could free-hand cut with a sharp utility knife run up against a metal yardstick, but it's a challenge to get exactly the right width; too wide, even a bit, and the film won't load correctly. Much better is to make a dedicated cutting guide (or more than one, if you use more than one film format). A big perk of handmade film is that there are no "obsolete" formats. Once you've decided what camera(s) you'll be using, you can start collecting backing paper and spools that fit the camera. You'll also need one whole strip of film—exposed or unexposed, it doesn't matter. You're using it to build a film cutting guide tool. |
|
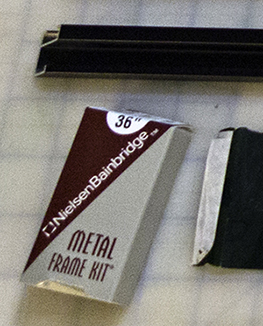
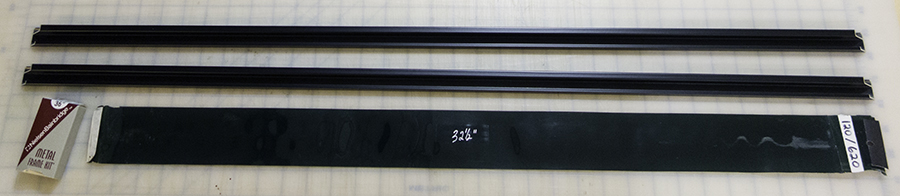
The second step is sitting down and making a map of your overlapping requirements. Each photographer will have his or her own. What size film will you be cutting? How many formats? What size darkroom do you have? Is the space permanent and dedicated, or temporary? A permanent coating table, pre-set dead level, is a joy of convenience. My coating table is modular. I use a 24"x 48" folding table, topped with a 26"x 48" piece of thick plate glass. That part is permanent. I can use it to coat plates, LF film, or paper, basically when the whim takes me. When I coat roll film, I need 36"x 48". For me, it's best to temporarily line up five 36"x 10" thick glass sheets side by side on my permanent table. I can then use Grafix's 50 inches-wide roll of Wet Media Dura-lar. You'll need the dimensions of your coating table before you make a cutting guide. The length of your cutting guide must be the same as the width of your coating table so that it can be clamped tight on the dried emulsion. It must have two straight, strong edges that will hold up to a sharp blade forever. Affordable is nice. Nielsen aluminum frame pieces are ideal on all counts. |

|
|
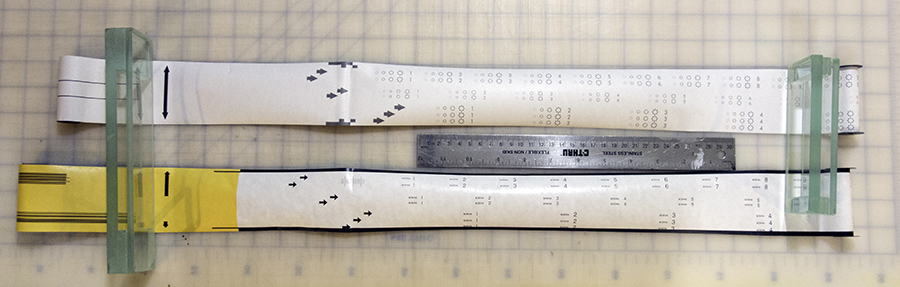
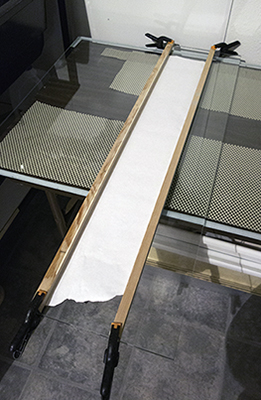
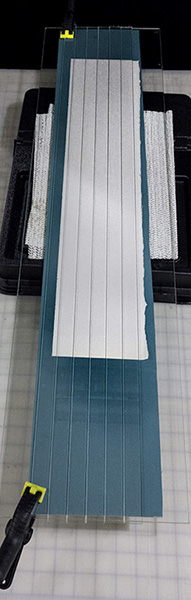
The above picture represents a couple of steps. First, lay down strips of double-sided adhesive tape along the long edges on both sides of the film on the emulsion side. Carefully line up one of the Nielsen frame pieces right along one edge of the film. Press hard to make contact with the tape. Next, place the second frame piece one sixteenth of an inch/2 mm in from the second edge. Press to make contact. Now, cut strips of foamcore board to precisely, yet snuggly, fit between the frame pieces. It takes a stack of three, and each will be a little different in width. These keep the frame pieces separated and form a nice, sturdy assembly. Now, take a sharp utility knife and cut off the overhanging sixteenth-inch film selvage. You have made the cutting guide a little narrower than the film format because you'll pick up that width again when you cut your film. |
|
|
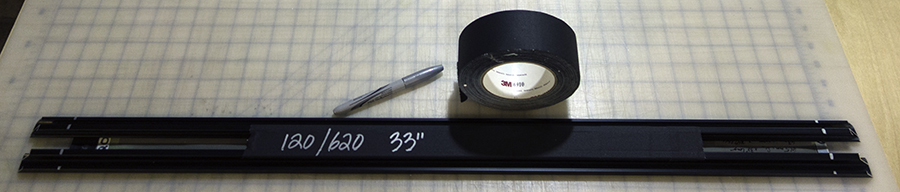
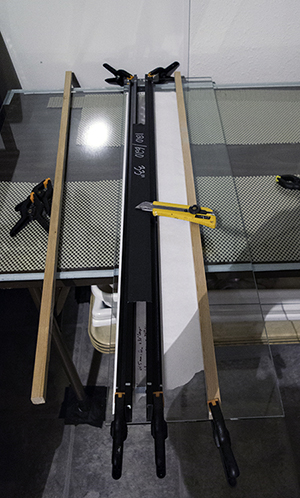
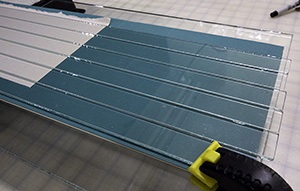
Last step is to cover the foamcore board with a piece of gaffer tape (or duct tape, but I like 3M gaffer tape for a lot of tasks, including film holder repair, so I always have a roll). Mark the frame pieces on both ends of the film strip. If you are cutting more than one format—either because you have the cameras, or in order to maximize your cuttings—the silver marks make it much easier to determine under safelight whether or not you've got a long enough coating of emulsion. |
|
|
|
BACKING PAPER |
|
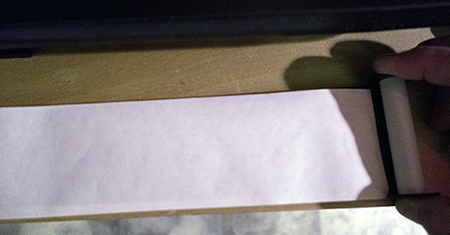
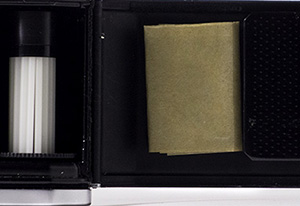
Interesting stuff, backing paper. It has a lot going on. Take a minute soon to open a package of film you're willing to sacrifice. Since old, expired film from Ebay is the easiest way for most people to get spools and backing paper in a hurry, you're likely to get the opportunity without wasting good film. Notice where the film is attached. Carefully remove it, but leave behind the piece of tape on the paper. If the tape is old and crusty, carefully remove it and mark the place. If you tear the backing paper, you can mend it with transparent tape on the white paper side of the roll. |
|
|
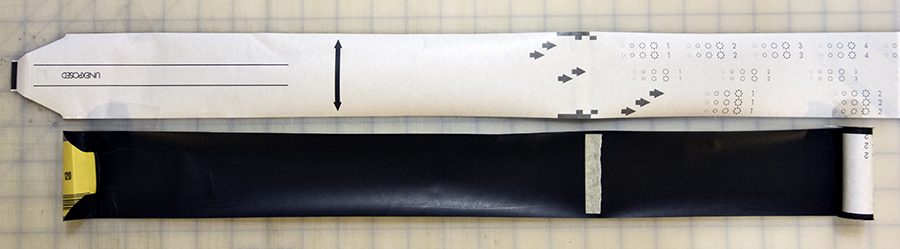
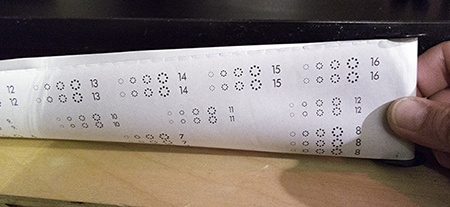
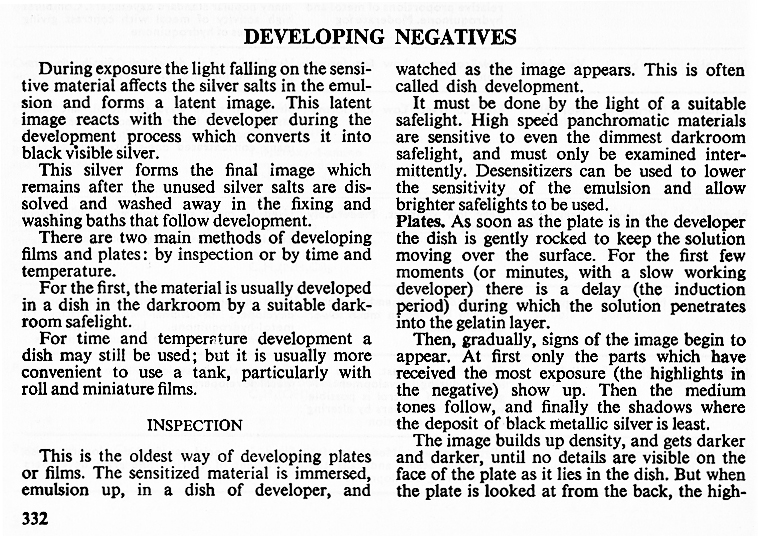
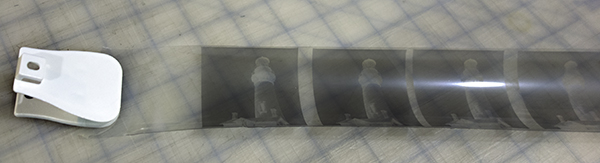
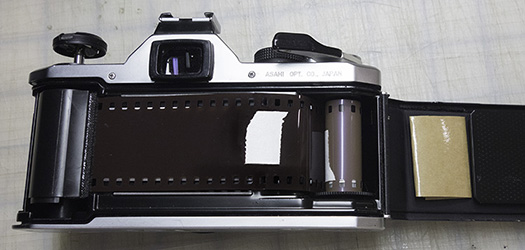
In the picture above, you can see the dent in the paper about in the middle of the field of little horizontal arrows. That is where the film attaches to backing paper. It is the only attachment point. The arrows are there to tell you that you are coming up on the first exposure—if you are using a camera with a ruby window to see the backing paper numbers. Most older cameras have this system. After you know the take-up leader is secure in the take-up spool, you close the camera and advance the film until the number "1" shows in the ruby window. The numbers on the outside of the backing paper are there for cameras with ruby windows, but they are very handy for us even when we use newer cameras that ratchet the film into place. More on that in the next section. |
|
|
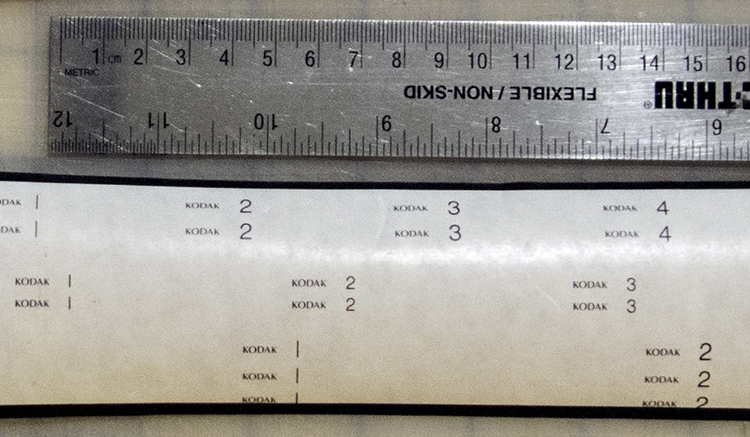
You can see that there are three lines of numbers in different spacings. Since this is 120 film, the top line is for cameras that expose 6x4.5 cm frames. The middle is 6x6, and the bottom is 6x9. The ruby window on any particular camera is located on the camera back so that the appropriate line of numbers shows through. With Kodak film, you can tell a new exposure number is coming up when you see the word "Kodak." Ilford film has four rows of circles that increase in size as you come up on the number. If you get in the habit of precisely centering the exposure numbers, you'll end up with even rebates, the clear space around each exposure. The large, single vertical arrow is used with cameras that automatically ratchet the film into place after each exposure. When you are loading the film, you line up the arrow with red marks in the back of the open camera, then close the back and advance the film until it stops. Cameras that don't fit the conventions have clever work-arounds that aren't necessarily obvious. A Beacon half-frame 127 camera has two ruby windows in back. You line up each number twice—first in the right side window, expose, and then in the left side window and expose again before repeating with each number. Sputnik stereo cameras have one window, but you advance the film in two's, i.e. "1", "3", "5", "7", "9", and "11" — twelve 6x6 cm exposures in six stereo sets. This is as good a time as any to plead the wisdom of reading your camera's manual. |
|
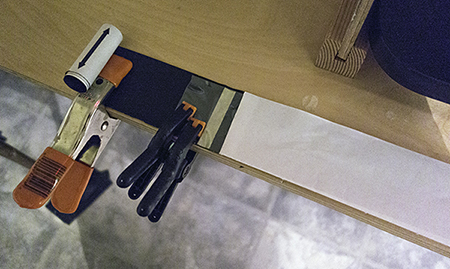
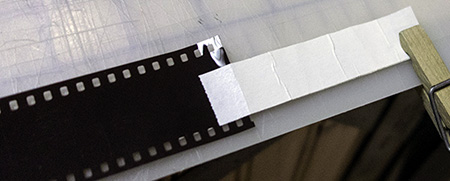
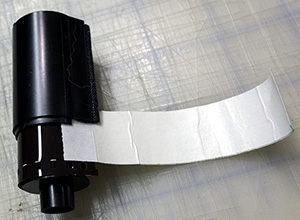
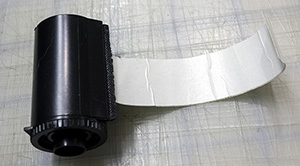
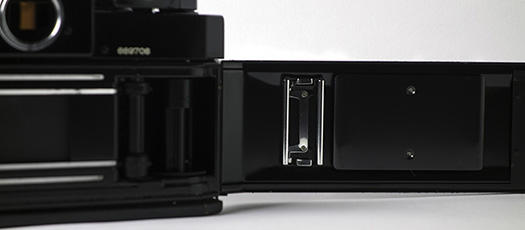
Below: The outside of a roll of Ilford paper, and the inside/film side of Kodak paper. Note the tapered leader/take-up tabs. This is what you stick in a slot in the film spool in order to catch the paper and film for take-up. The piece of tape is where film was attached, and will be again. With care, backing paper can be re-used indefinitely. |
|
|
TIP: 120 paper is easy to come by. Most of the other formats, not so much. Spools are available on Ebay. Also, a spool usually comes with a camera purchase. However, it can be a challenge to find enough original backing paper for "orphan" formats. Happily, if you have just one original you can make as many copies as you need from 120 paper. First, figure out which line of exposure numbers go with your camera (if it's a ruby window model). Punch a small hole through the middle of each number. Lay the backing paper on top of a stretched-out roll of 120 paper and mark through the holes. (Don't use a red pen. Red is invisible under safelight.) Then cut the 120 paper down to size, making sure that both papers stay in alignment from start to finish. You may have to cut new tapered take-up tabs. Voila! New backing paper for your old camera. |
|
|
|
COATING FILM—Many Options |
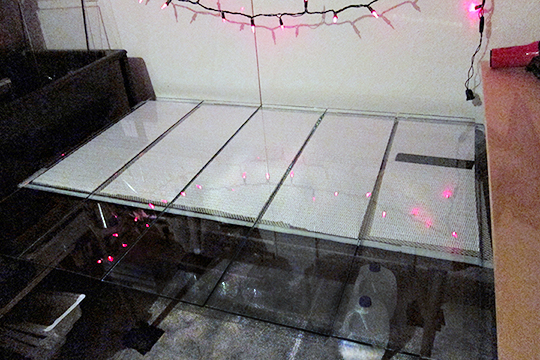
Coating table set up with removable 10" x 36" x 3/16" glass sheets. |
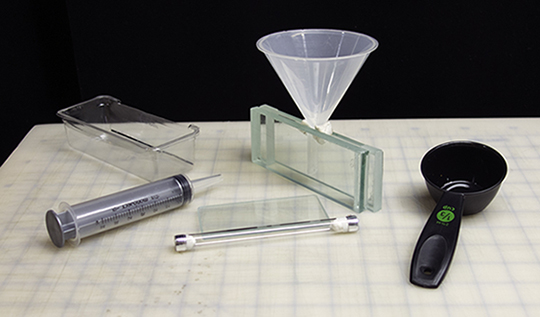
Coating tools: mix and match to taste. |
One goal. Two different ways to go. Note: I used freezer paper to illustrate the emulsion. The appearance of a dried strip of emulsion is almost identical, except that a bromide emulsion is faintly yellow rather than white. |
|
Note #2: 5-inch puddle pushers are best used for 4"x 5" and 5"x 7" sheet film. 9-inch puddle pushers are used for 4"x 5" (two sheets, 4" wide, cut from a 5"x 8" piece, Whole Plate (6.5"x 8.5"), and 8"x 10". 12-inch puddle pushers are used for 11"x 14" film negatives. |
|
|
CUTTING STRIPS OF FILM |
|
|
|
ROLLING THE FILM |
|
Everyone's work space is different and requires slightly different strategies, but the basics are the same. You need clean and convenient. |

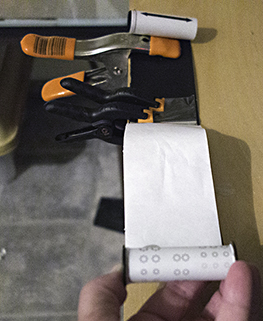
Now, stretch out the film toward the spool and hold it in place with a weight or clamp. |
Remove the spool-end clamp. Grab hold of the spool and pull the roll taut. Tightly roll the backing paper until it just catches the end of the film. If things move on you, your clamps aren't strong enough. |
Turn over the backing paper and see where the numbers are. If your strip is shorter than the format, you can see how many exposures you'll get on that roll. Make a note. This information will follow the roll of film from now until processing. |
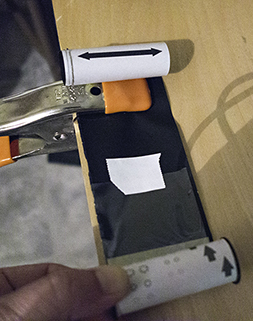
Roll up the film. The only trick is keeping the film from scooting sideways off the backing paper. You'll avoid this if you roll with two hands while pulling straight back from the head clamps. Roll tight. When you're done, you'll need to have the roll a little bit narrower than the ends of the spools. If it isn't, unroll everything and start over. When you get to the end, remove the clamps from the film, but not from the backing paper. The emulsion should now line up with the attachment point (more or less). Tape the film to the backing paper. I use white artist tape. Remove the last clamp and finish rolling. Fasten the leader end to the roll with a small piece of tape. |
Put the film it its own bag or box and label it with a piece of tape. Record the recipe name, the date made, and how many exposures are on the roll. When you load your camera, transfer the information tape to the back of the camera. In most respects our handmade and rolled film is treated just like commercial. An exception: our film shouldn't be stored or loaded and unloaded in bright light. A roll of commercial film is manufactured to be used once. When the machines are rolling the film, they manage to crimp the edges just enough to keep light out. When we re-use a roll of backing paper, the crimping is gone and light can pipe (i.e., leak) into the edges of the roll. You'll know light piping has happened when you develop the roll and the edges are black. This doesn't mean you have to have a darkroom to change film. Just be aware of the issue and experiment with your solutions. |
|
|
|
DEVELOPING HANDMADE ROLL FILM |
|
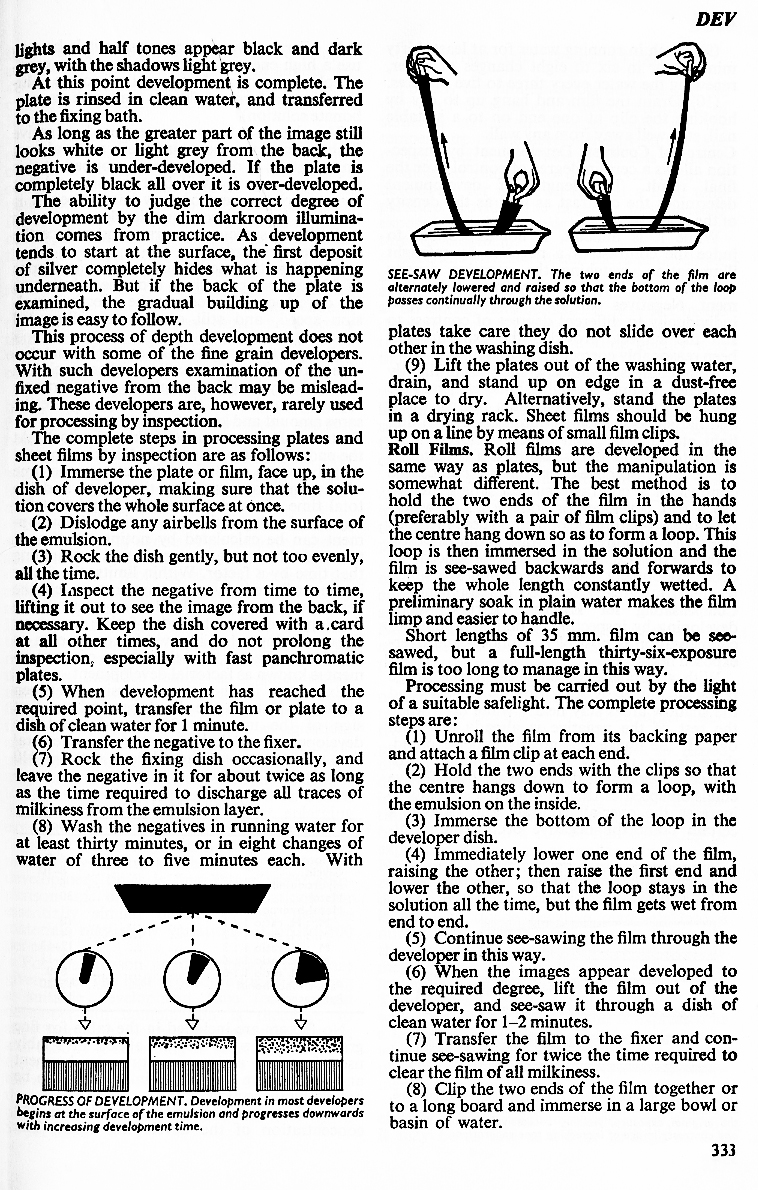
Handmade film has many outstanding virtues, but "tough" is not among them. The emulsion, once wet, is fragile. I've never tried, but I don't think it would stand up to reel development. Fortunately, there are alternatives — either tray development or "See-Saw" development. For those of us who have often cursed the process of getting film on a reel in total darkness, both alternatives are a delight. From The Focal Encyclopedia of Photography, 1960 edition. Development by Inspection — both plates and roll film. |
|
|
|
The See-Saw technique works just fine. It also has the advantage of being very economical with developer. A small Rubbermaid food container is a perfect tray. Having said that, I personally prefer tray development—or more precisely, trough development. |
|
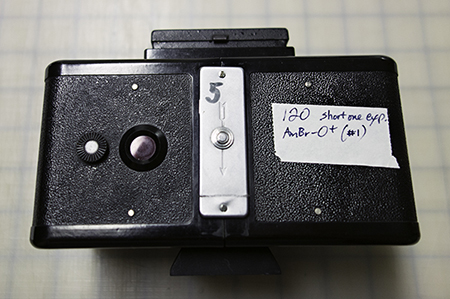
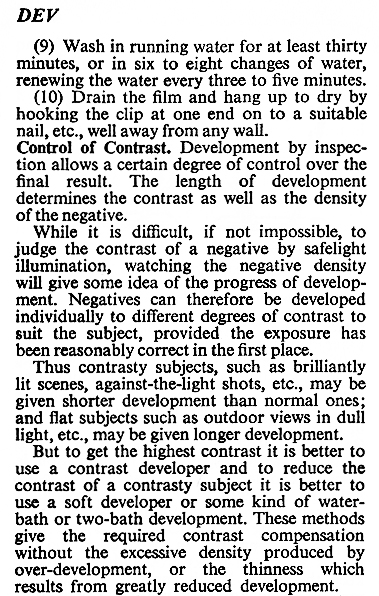
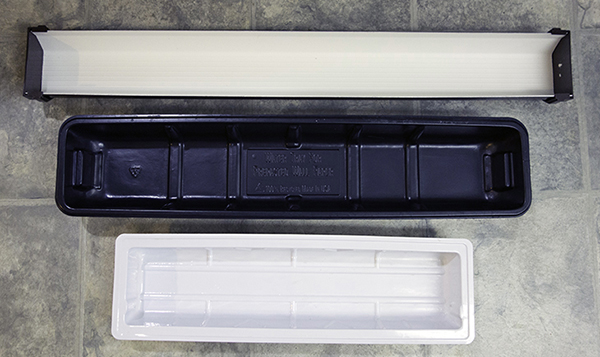
Since there is no reason to waste developer, a tray/trough that fits the film format as closely as possible is a very good thing. Both wallpaper trays and vinyl gutters are made for the job. Vinyl gutter material has the advantage of being customizable. You just cut them to length and close the ends with self-gasketing end caps. The only disadvantage is a bit of labor to make them. Their advantage is that an entire roll of 120 film, with clips, can lie in the bottom. The white color makes seeing development progress very easy. A disadvantage is that when they are full of liquid they can twist when you try to pick them up. The black tray is Sherwin-Williams' brand. They are very inexpensive, and the black color makes it easy to see the film clear in the fixer. The white trays are from Lowe's Home Improvement and they are a good size for 127 film. I bought my wallpaper trays a couple of years ago. Today, I do most of my developing in vinyl gutters. Merchandise in stores changes constantly. What is here today may not be available tomorrow. (Although I think gutters are with us forever—at least on the Oregon Coast!) Determine how long your film plus clips will be and then take a tape measure on a shopping trip. Just as with tray development of sheet film, you will want a tray for each processing chemical and at least two for washing. Below is a roll of 127 film in the wash tray. The other three trays are developer, stop (plain water), fix. You could add a second fix bath if you wish. The film was exposed in a Beacon 127 half-frame camera. Note the film clips on both ends. 
|
If you standardize which side of your film clips you attach emulsion-side, you'll always be able to guarantee that you are processing emulsion-side up. When the film is dry it cups to the emulsion side, but when it is wet, it flattens out and it can be very hard to know which side should be up. When you have finished washing, take a clip in each hand and see-saw the film through a small tray of Photo-flo or similar. Hang the film to dry completely before you touch it again. If you are hanging from a hook on the wall, have the emulsion side toward the wall. That will cut down a bit on dust. I have never gotten around to investing in a dedicated film drying cabinet, but they are nice if you have one. TIP: Wet film has a nearly irresistible attraction for walls. If you are hanging film to dry from a hook or nail in the wall, have it far enough away from the wall that the film doesn't end up on the wall! |
|
|
|
35mm |
|
35mm is a little more complicated than 120. The cameras (with few exceptions) are designed to pull the film through without backing paper. They do this with ratcheting sprockets. If the film sprocket holes don't engage with the camera's sprocket wheels, the film can't advance. It takes a specialized sprocket-punching machine to make commercial 35mm film. George Eastman Museum has one for its workshops, but that's the exception. Even if you take a workshop, what do you do when you get back home? The trick is to outsmart the camera. By using commercial 35mm film as a backing (just as you would 120 backing paper), we can photograph with handmade 35mm film. The commercial film backing can be used over and over. Because so many rolls of 35mm film are possible from a batch of emulsion, this is a very economical way to photograph. I usually get 12-14 exposures from one batch of X2Ag emulsion. Fourteen exposures is close to the limit. Because there are essentially two pieces of film advancing together, only half the number of commercial film exposures is possible. I started by using expired BW film I had in the refrigerator: TRI-X and TMax 100. Fortunately, I fussed around with so many poor designs as I was figuring things out that I used up the old film I had. "Fortunate" because I found a better type, in a film I'd probably never buy otherwise. I bought the cheapest film I could find: Kodak UltraMax 400, 36 exposures. The base is thin and one roll is the perfect length for two rolls of handmade film. Rather than trying to reuse the original metal canisters, I've had excellent results with If you're not planning to reuse the metal canisters, a bottle opener will get a ring off so that you can remove the spool. If you do want to reuse the canisters, you'll be better off with the tool that's meant for the job (film cassette opener). Be gentle and careful so that you don't bend the ring. It has to be in good shape to reuse the canister. You can do this in the light. Metal or plastic, be careful with the felt strips on the canisters. If they pick up dust, you'll end up with scratches along the entire length of film. Step by Step Remove commercial film from its canister and spool and cut off the leader on one end and any roughness on the other (spool) end. Make the cuts at clean right angles to the long edges of the film. Cut the roll exactly in half. 
|
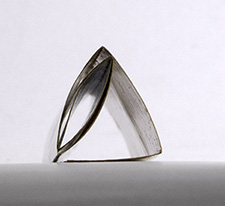
Stretch one of the pieces out flat with the emulsion (dull) side down. Secure each end with a clamp. Take a seven-inch long piece of ¾-inch wide tape and make a 3-inch tab along the bottom end of the right side of the roll of film by sticking ½-inch of the tape to the film and then doubling it back on itself to stick to the other side. This is the new film leader. |
|
Flip the roll over so that the emulsion side is up and the leader is on the left. The orientation is important. |

|
To remove the spool from a reusable film canister, unscrew the plastic ring on the knob end and pull out the spool. Tape the spool to the end of the roll (opposite the leader) so that the knob end is down (on the same edge as the leader). The roll is ready to be loaded or rolled loosely until needed. |
Coating, cutting, and rolling 35mm: Coat your film with a 5-inch puddle pusher. There's information here and more information, including the 'X2Ag' recipe, in the Light Farm book. The 35mm rolls are cut with the same general method as 120 roll film, but of course there are a lot more of them! The cutting guides are strips of glass. I had my favorite glass guys cut and smooth them. They are 36 inches long by an ⅛-inch thick, and 22-23 mm wide. I handle them carefully, but the ⅛-inch glass is pretty sturdy. I haven't broken one yet, and I'm an infamous klutz. Line up the glass strips on the sheet of film (newsprint here for the purposes of illustration) on a cutting surface elevated a bit so that you can clamp the top and bottom of the first strip. That's the only one that needs to be clamped. Then, use a sharp utility knife, preferably with a new blade, and cut smoothly down the length of the most right-hand strip of glass. You'll have removed the selvedge from the first roll of film. Remove the first glass strip and set it aside. Cut down the length of the second strip of glass and the first roll is done. Keep cutting and removing glass strips until you come to the last. That cut will remove the selvedge of the last roll you can cut from the sheet. The strips of film will spring into loose rolls when you cut them free. Carefully store them in a lightproof paper safe, or similar. If you store them with a cut edge down, the emulsion won't get scratched. The roll of backing film is about 30 inches long. You can load it with strips of emulsion that length, or shorter. The same piece of master backing film can be used for any length of emulsion. It's the beauty of the system. It's very accommodating to the length of film you are able to successfully coat, or you wish to load in your camera. Sometimes a few exposures is all you need for a day. 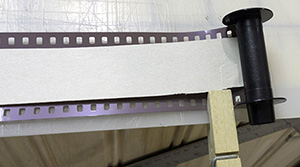
Align the strip of emulsion so that it fits between the sprocket holes and is right up tight to the spool, but not caught in the tape holding the spool to the backing film. Start winding tightly, keeping the emulsion between the sprocket holes. When you come to the end of the emulsion, secure it with a small piece of tape. Don't cover any sprocket holes. |

|
|
Keeping one hand firmly on the rolled spool so that it doesn't unwind, turn the assembly over and place another small piece of tape on the backing film, opposite where you secured the emulsion. (The clothes pin in the above illustration is just there to stand in for my "firm hand" while I paused to take the picture.) |
Continue to roll the film until you get to the beginning of the leader. Hold the canister so that the felted opening is on the right. Carefully slide the roll of film into the canister so that the knob is on the bottom. Replace the retaining ring until you are ready to load the film into your camera. |
|
Needless to say, the whole operation until now has been in safelight conditions. Red LED mini-bulbs are a safe bet for both colorblind and ortho film. |
Loading the film: (Again, safelight conditions—the one difference from the absolute dark requirement of commercial film.) Start your tape leader just as you would the original film leader. Advance the film until the piece of tape matching the emulsion-securing tape is almost past the exposure window of the camera. Close the back. Make one advance to be sure the uptake is working and then start photo'ing. Do not first advance the film until you get to #1 on the counter dial. Shoot until the film stops. Because you loaded the emulsion right up to the end of the spool, you know that the last exposure you made is a good one. |
|
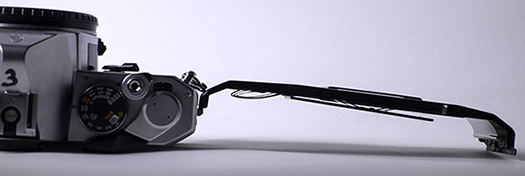
THE SURPRISING VARIATIONS IN 35mm CAMERAS This I did not know. Before I started on my little film adventure, I'd only owned a Pentax MX. I used to love that little camera. (Still do!) But, since it was the only 35mm I'd ever loaded, I didn't give it much thought that there is only a floating pressure plate on the inside of the door. I was getting very sporadic luck with keeping the film pressed onto the sprockets. Every other roll or so the sprocket holes would disengage from the sprockets and then the film would no longer advance. The solution (after an embarrassing number of fails) turned out to be simple. I have attached a roll of plasticized paper to the back between the pressure plate and the hinge. For the MX, getting the size just right is important. I used a backing sheet that comes in each package of Pictorico OHP. It works perfectly, and although I'm sure there are other perfectly good materials, I can't make any firsthand recommendations. |
Start with a sheet of the plasticized printing backing paper that comes in each package of Pictorico OHP. Make the first fold at ¾-inch from the edge. Crease the fold with a butter knife (or similar). Make the next fold over the first. Crease again, and repeat until you've made six creased folds. The roll will be almost an inch wide after all the folds. Cut off a 1-1/4" piece. Now, take two 1-inch pieces of double-sided adhesive tape and put one piece on the bottom (when looking at your piece in the orientation of the illustration here) and the other piece on the inside of the next fold. The bottom piece will secure the roll to the camera and the one inside piece keeps the roll from unrolling, but still lets it be springy. The new "springy roll" lines up along the outside of the pressure plate, but not under it. It stays in place as long as you are using the camera with handmade film. |
|
But speaking of variations: many cameras don't need the help. The Canon F-1 has its own film roll "manager." It has worked perfectly every time I've used it. That hasn't been often, however. The camera is as heavy as a tank. I found a Nikon F but I haven't gotten around to using it yet. Its pressure plate helper is a single bar and lower than the pressure plate. I suspect that it will need a bit of extra help to hold the sprocket holes in place. |
|
|
|
Link: There are images made with handmade film in various cameras and formats in my Zenfolio "Photo Album." |
|
|
| < Dry Plate Paper Negatives > |