|
The book is finished! |
|
August 31, 2015 |
|
It's hard to believe that my last posting was last October. It was a few days before Halloween and then it was Thanksgiving and then Christmas. On January 1, I started writing a book on emulsion making. I fully expected it was going to be done by spring. Let's just say I underestimated! But, it is finished and give or take printing time, it will be ready in a week or two. I'll have more about it then. But now, I could not be more pleased to present the work of a new contributor — Pierre Van de Vliert. Pierre is a dry plate artist. I can do no better than let him take it from here. Welcome, Pierre! |
|
The Light Farm book |
|
September 14, 2015 |
|
Cracked. Scrambled. Fried. This is your brain on publishing! I am overjoyed to be done. It's been a tremendous project. I doubt I'd have started if I'd known how much work it was going to be, but I am very glad I didn't know! It's been a surprise how many decisions need to be made toward the end of the process. Amazon or Blurb? is a big one. I went with Blurb distribution instead of Amazon. When it came right down to it, Blurb is beautifully in line with the mission of The Light Farm. Blurb will sell at their cost. Amazon charges 15% over that. Print-on-demand publishing is expensive enough as is, even though I'm not adding a profit for myself. Additionally, Blurb has the option of a full book preview. The virtual book will be a free extension of the Light Farm website. I will say, however, the paper book is very pretty. Blurb does a nice job. The pages are premium matte paper — identical (or nearly so) to the paper used by traditional publishers. It is my hope that paper copies of the book find their way out into the real world. I will be giving away a number of copies to educational institutions. I still have a few questions to sort out. I've left the website second edition hanging for a year, and now the book makes it a bit redundant. I must ponder a while on this. Fortunately, "pondering time" is the perfect excuse to go walkabout with a camera. I can hardly wait to start working with Volume #2 materials! The book is for sale on Blurb. I hope you enjoy. |
|
Back in my happy place — "where-the-wind-blows me" research and photography |
|
November 1, 2015 |
I woke up this morning knowing I was ready to get back to blogging. I've missed it even though six weeks ago I would have thought that impossible. There is deep truth in "to everything there is a season." I've been happily burning through the mountain of materials left over from recipe testing for the book. It's been great fun to photograph without a sense of limitation. It is the perfect way to really get to know your materials. But the mountain is finally down to a small stash. The trick will be hanging on to that free feeling even when I start having to make new materials again. It's strangely difficult to switch modes of thinking and writing. Writing the book was all about trying my best to teach information I already knew well. Once upon a time, the recipes in the book were in the R&D stages, but that has been a while ago and it is very easy to get very comfortable in the Known Universe. It is vital to stick with one or two recipes and workflows until they are second nature. Most people want to then concentrate on their art. I keep trying to believe that's what I want. It seems, however, that it isn't. I want to rescue as much history as I can. That requires leaving my comfort zone again. It's time to go exploring in the land where thar be dragons. This will be a research blog. I will be starting down some roads that turn into weedy dead ends, but I'm sure that at least a few roads will lead to buried treasure. Some roads will be deadly dull, but I hope that at least a few roads get people so excited they start working the problems and hit on the answers ahead of me. Nothing would make me happier. I will be delighted to publish the work. The Light Farm is, and will remain, a collaborative effort. I've started working with reversal processing. More on that in the next entry. |
|
Reversal processing — episode 1 |
|
November 3, 2015 |
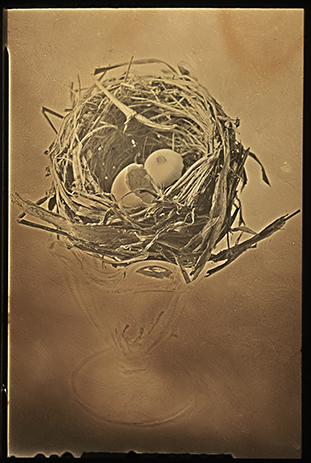
Getting closer. Reversal processing is reasonably intuitive. There is a first exposure and development, followed by bleaching away the exposed and developed silver. Then, you make a second exposure and develop the remaining silver, i.e., the unexposed silver from the first exposure/development. Should be easy-peasy except the whole process is a bag of mixed-up puzzle pieces! For this first round of experiments I've been using a Photographers' Formulary processing kit: "Formulary Reversal Processing for T-MAX Film." The first developer is a vigorous MQ (metol and hydroquinone) variety. It also contains 32 g of sodium thiosulfate (a.k.a. hypo) for It stands to reason that the greater the first exposure, the less unexposed silver will be left over for the second exposure and development (the positive image). Less silver means a lighter positive. It's taken me a few tries to understand just how dense the negative has to be. |
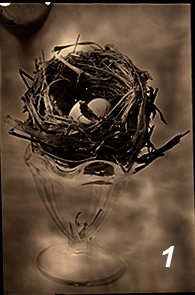
It seems that exposure which would produce a good conventional negative is totally insufficient for reversal processing — at least with this set of processing chemicals. Negative #1 was given what I'd consider normal exposure. Normal development in HC110 would have made a great negative. "Normal" exposure should be about 23 seconds at f/16 on my shooting table. I haven't a clue what caused the swirlies. The big boo-boo in the upper left corner is a thumb print. I don't know when I touched the emulsion surface, but I won't be doing that again! Negative #2 got 45 seconds. The upper right corner went clear in the bleach bath. Perhaps thin emulsion in that corner (??). If so, it wasn't obviously thin when I loaded the film. The film in that corner is crystal clear. For negative #3 I bumped the exposure up to 1 minute, 15 seconds. The clear area on negative #3 formed differently than the clear area on #2. It didn't go clear in the bleaching bath. It showed up during fixing. I think that perhaps the first exposure put too much exposure in that area and there wasn't much silver left to re-expose and develop. It's strictly a theory at this stage but the inverted negative of the onion (normal exposure, and development in HC110) shows that the upper left corner of my shooting table has the brightest area of illumination. |

I've been modifying the heck out the instructions that came with the Formulary kit. (AmBr-O is not a T-grain emulsion.) I followed them to the letter the first time, and then again a second time. Both sheets of film were as pure black as emulsion gets. The sheet of film shown in the November 1 entry was my third try after those first two. I doubled the time in the bleach from five minutes to ten. Also, I decreased the second exposure from the recommended one minute per side to 30 seconds per side. I finally got an image, although it is badly stained and looks more like solarization than reversal. The Formulary bleach recipe calls for 1 part permanganate solution to 1 part sodium bisulfate solution. By the end of the bleaching process the combined solution looked like brownish purple sludge. My guess was to decrease the sodium bisulfate. I made a combination of 3:2 and that's what I've stuck with. The bleaching is much nicer and the solution is still a clear purple at the end of the process. Also, I divided the bleaching step into two parts with a short distilled water rinse between the baths. The total time in bleach is unchanged. Perhaps the biggest modification was to the second exposure and development. I gave negative #3 just five seconds of exposure per side (150 watt bulb at 1 foot). Also, I increased the dilution of the second developer from 1:2 to 1:3 and decreased the processing time from three minutes to two minutes. |

I think negative #3 is close to right. Permanganate bleach will probably always leave some degree of staining. I think the color is pretty — somewhere between sepia and selenium. If I had more film I'd test a few more things right now to try to bring the contrast down while maintaining the lightness. Perhaps the solution is as simple as reducing the contrast of the lighting. Unfortunately, I only have ten more sheets of this batch of AmBr-O. I want to save it for comparing potassium dichromate/sulfuric acid bleach with permanganate bleach. Many experts consider K-dichromate bleach superior to permanganate. I've got the sulfuric acid ordered. In the meantime, I'll make another batch of film. The nice thing about AmBr is its absolute lack of base fog. It should make a pretty positive image when everything is hashed out. The next entry will be the complete list of modifications I made to the Formulary instructions. It seems like it's a good kit. Permanganate may not be considered the best bleach for this process, but it is relatively safe to use and it can be shipped without bumping into hazardous materials restrictions. At this stage, I think I could recommend it as an easy way to get started. However, I'm hoping that the K-dichromate/sulfuric acid bleach won't leave a stain. My ultimate goal (pipe dream ?!) is autochromes. |
|
35mm photography — episode 1 |
|
November 6, 2015 |
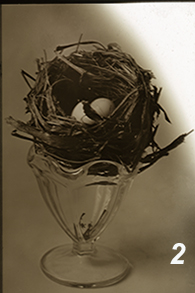
I've spent the last couple of months with two cameras (three, if you count digital) — a Pentax MX 35mm and a couple of lenses, and a Pentax 67 and a fisheye lens. I have been enjoying both immensely, but perhaps especially the 35mm. The freedom to move unobtrusively among crowds of tourists is marvelous. Invisibility can be a photographer's best tool. The 'X2Ag' negative for the photo on the left (Girl and Camera #1, Cape Perpetua) was with a 100 mm lens. That's long enough to not be in someone's face. The seal at the aquarium was with a 35 mm lens pressed right up to the glass. The wide angle delivered enough depth of field even at low light. I didn't want to come down from 1/60 second shutter speed. The negatives are only 0.85 x 1.38 inches. Handmade 35mm has to be a bit narrower than commercial film so that the film rides easily between the sprockets. A piece of commercial film acts just like backing paper does for 120. Since the thickness of film is doubled for every wrap around the spool, I've only been getting thirteen exposures from a roll. Actually, though, that works out perfectly for me. I always thought 36 exposures was too many. A dozen or so lets you use up a roll in a good session, and the length works well for See-Saw development. 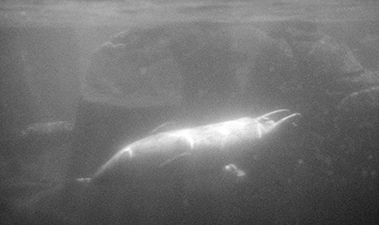
|
|
Reversal processing — episode 1¾ |
|
November 6, 2015 |
|
Words you do not want to see from Amazon: "Not yet shipped Delivery estimate: We need a little more time to provide you with a good estimate. We'll notify you via e-mail as soon as we have an estimated delivery date." I placed my order for sulfuric acid on October 31. Supposedly, the item was in stock and scheduled to arrive within two business days. Now, time will tell. I'll give it a little longer before I go looking for the acid somewhere else. And, unless someone emails me wanting my modifications for the Formulary reversal kit immediately, I'll hold off on those until I can run a new batch of film through. In the meantime: 35mm photography — episode 1. |
|
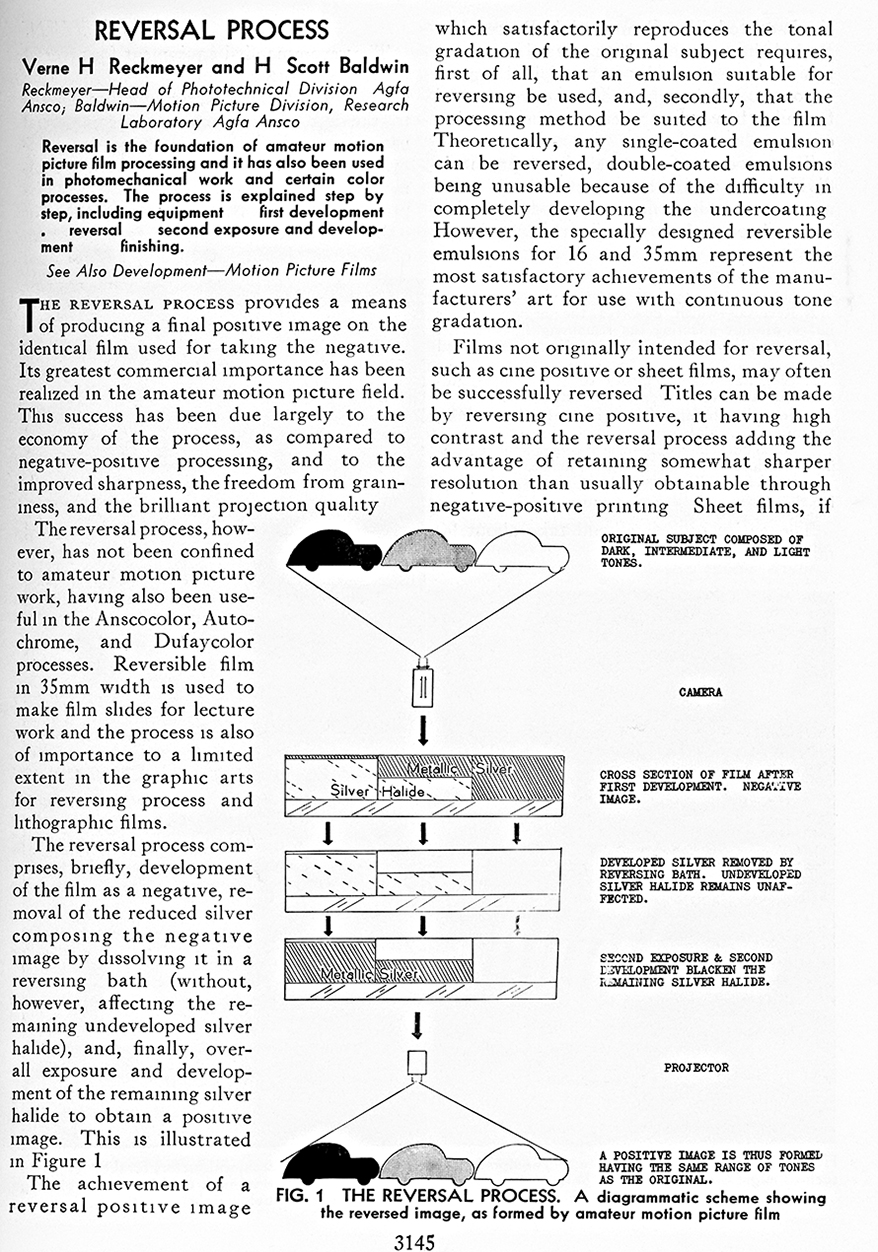
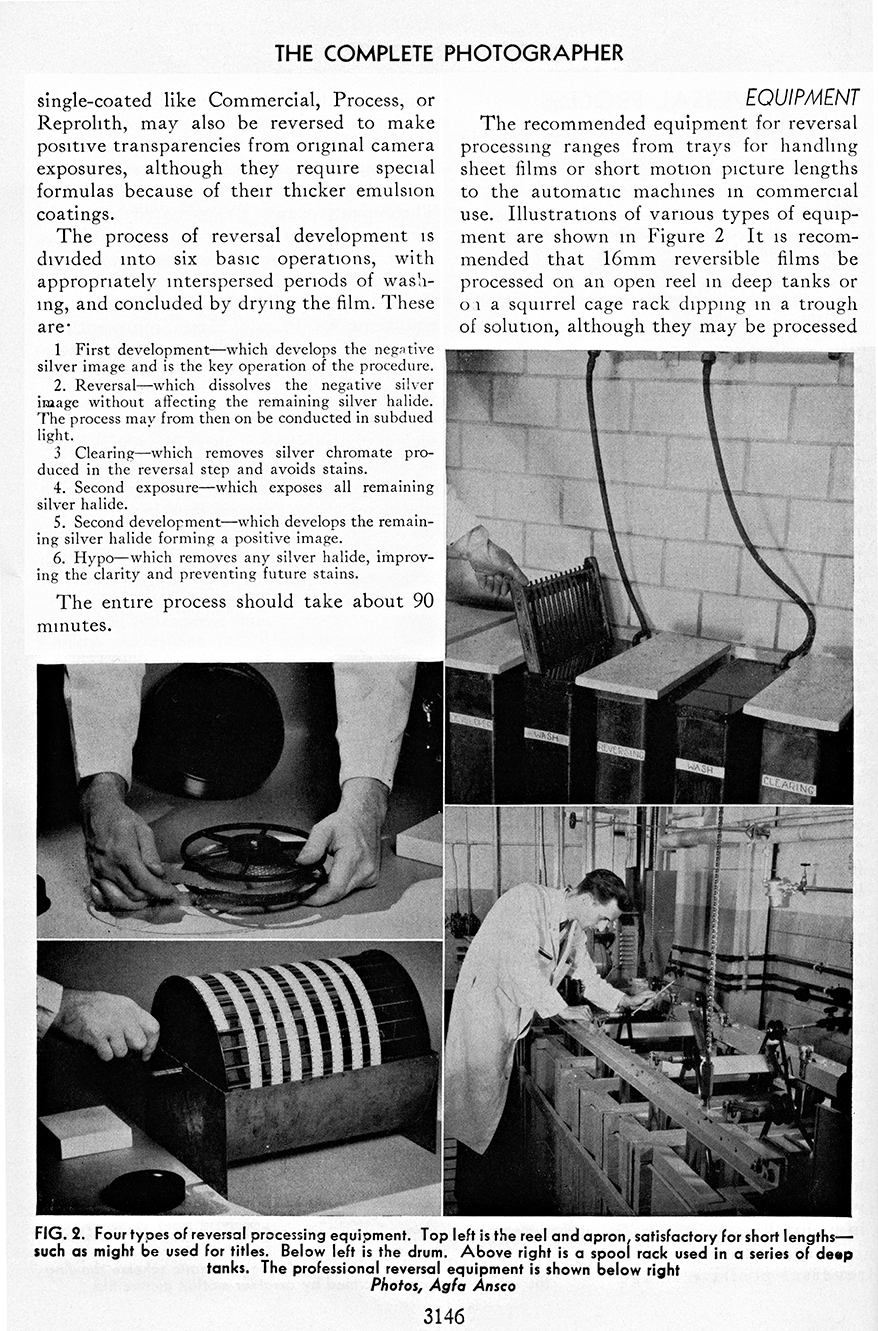
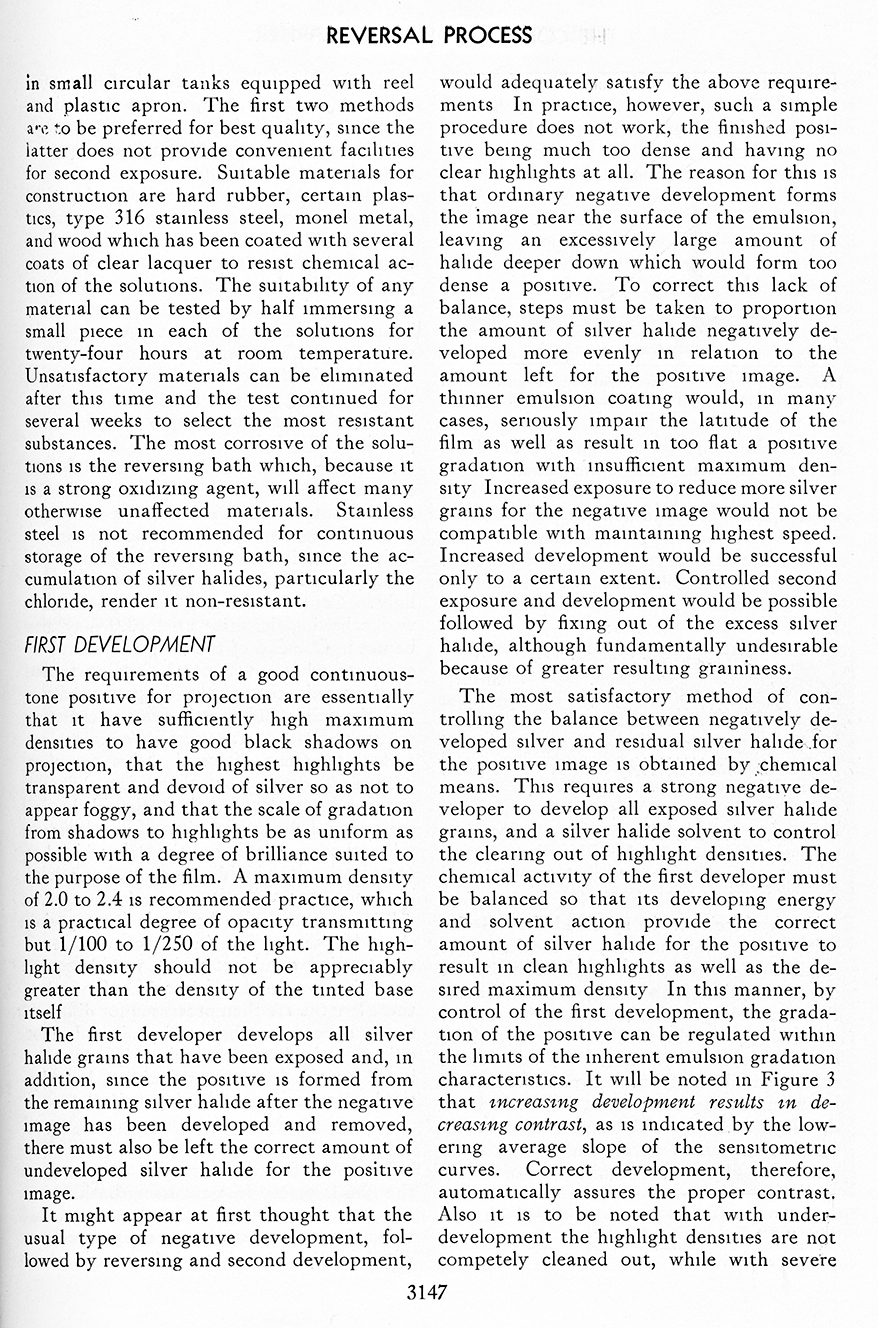
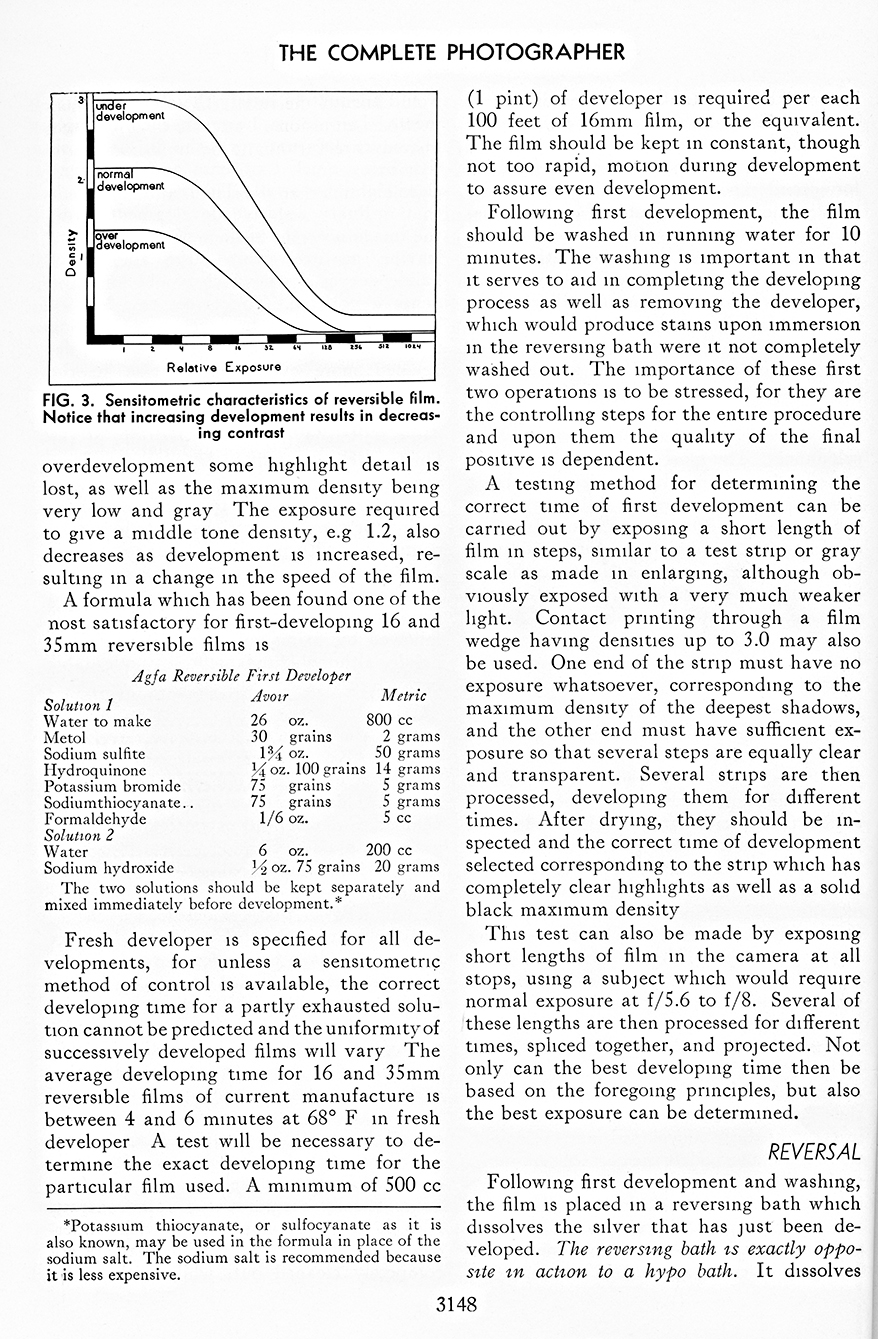
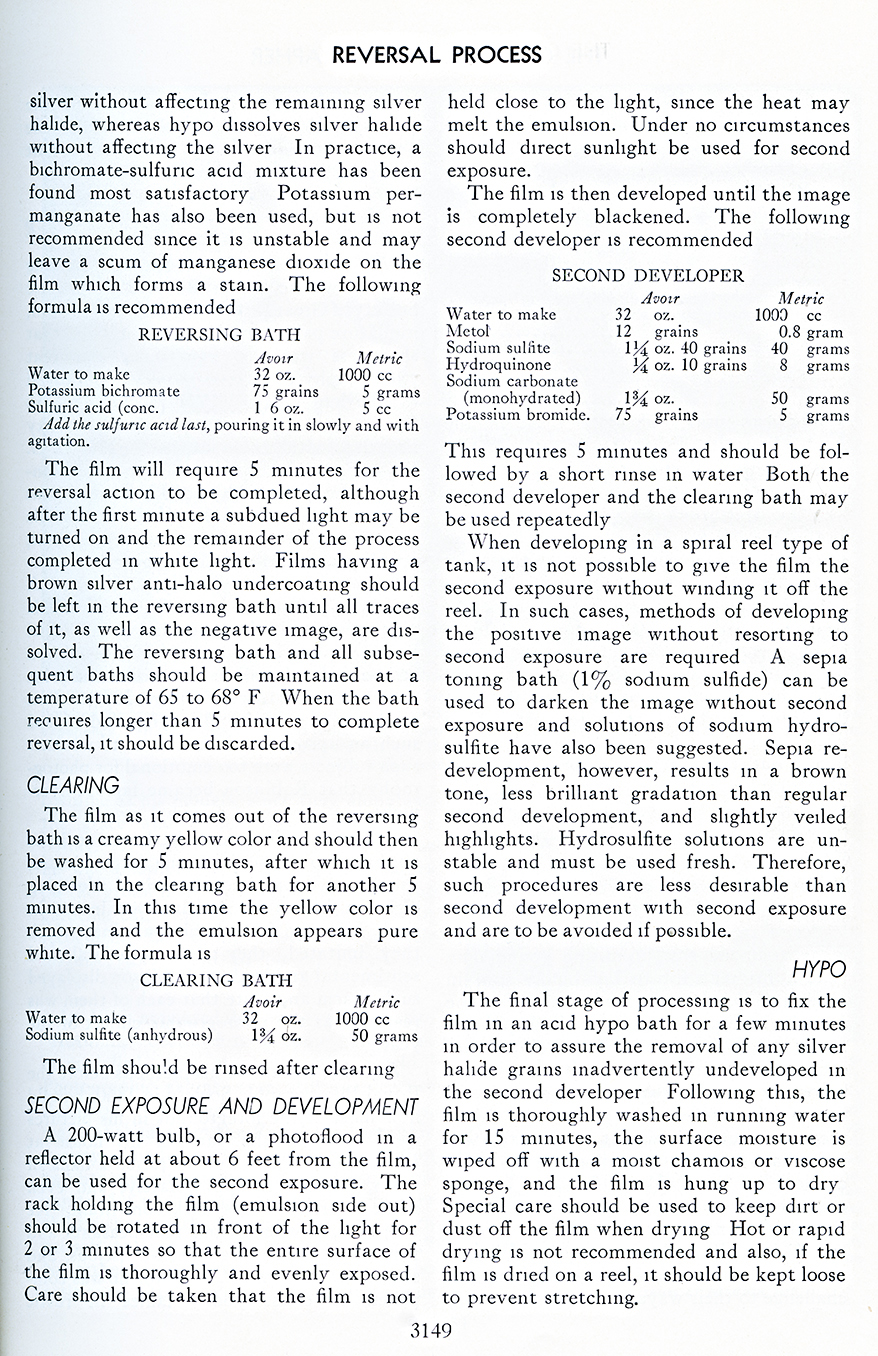
"Reversal Process" — The Complete Photographer, An Encyclopedia of Photography, |
|
November 11, 2015 |
|
|
|
|
|
|
Autochrome — episode 1 |
|
November 12, 2015 |
|
|
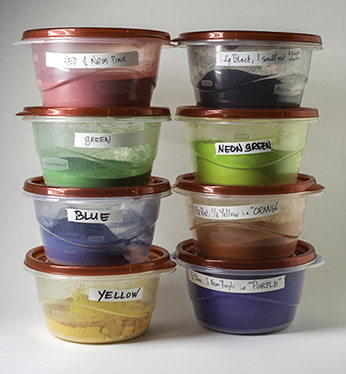
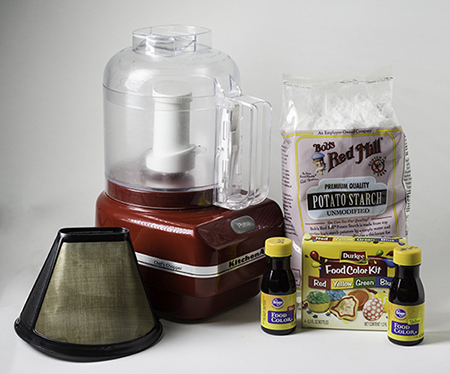
I've wanted to make autochromes since the first time I saw them — not from any Holy Grail-type motivation, but simply because they are so beautiful. Today, for me, there is another aspect to the endeavor. An autochrome pulls together a number of different facets of photographic science. Simply working toward the goal of making an autochrome becomes directed research into all those facets. Understanding one deepens the understanding of another, and 'round she goes. Reversal processing is but one part of many that go into making an autochrome. There is only the tiniest corner of my ego that believes I'll be successful. (It's the same corner that holds out hope I'll ever again wear the skinny jeans hanging in the back of my closet!) But, I like the notion that we are defined by our Quests. This one is particularly harebrained. I like that. "Sensible" is highly overrated. I've been working on the colored starch, off and on, for months. It's not a task that can be rushed. For Round One, I'm going traditional with potato starch. It's not fancy starch. I don't know the milling size of the grains. It's very inexpensive, as is the food dye. If this is a fail, it won't be an expensive fail. If in the end it actually works, this is what the instructions will say: Put potato starch in a small food processor. Add a couple of drops of food coloring. Pulse several times, then more dye and more pulsing. Repeat until the starch is richly colored and just starting to clump. Spread the damp, colored starch on fruit leather drying sheets (or similar) and dry completely. Break up the dried starch into pieces that fit into the food processor and pulverize. Force the starch powder through a metal mesh coffee filter with the back of a plastic spoon. Discard the pieces that didn't go through the mesh. Store the colored powder in airtight containers. |
|
35 mm — episode 2: seasonal variation in emulsion speed |
|
November 16, 2015 |
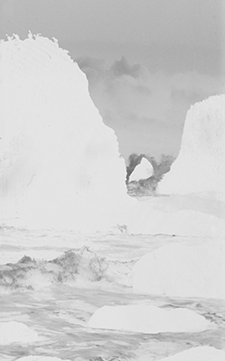
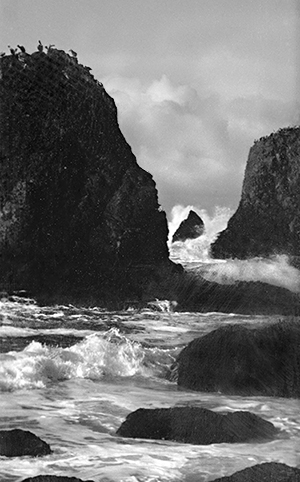
I seem to be reaching the maximum potential for year-round handheld photography, at least for many of my favorite scenic conditions. I made the top photo this weekend with X2Ag in a Pentax MX 35mm camera with a 35mm lens; 1/60 sec and f/2. It is a very thin negative, even though it was processed for 15 minutes in HC110. The interiors I tried to make at the farmers' market turned out completely blank. At the county fair this summer, in the same building, I at least got something. The light coming in through the open doors and the few skylights apparently made all the difference. Emulsion speed with colorblind and ortho emulsions is all about UV light. The amount of UV changes with the seasons and weather. I've been working on developing personalized seasonal speed charts for my emulsions — especially X2Ag. The EPA has an excellent UV website that is very handy. I keep it bookmarked. http://www2.epa.gov/sunsafety/uv-index-1 I love photographing at the Yaquina Head Lighthouse Natural Area. There's so much there, it's practically cheating. |
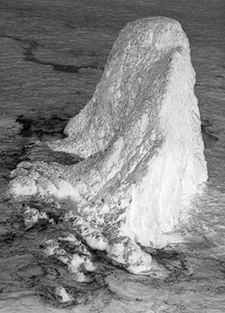
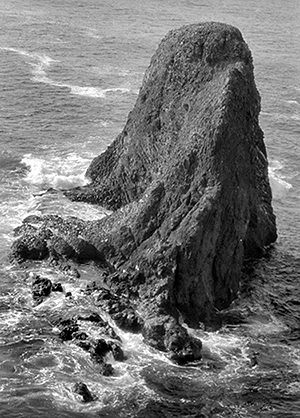
In the best of conditions, photographing the jet black basalt seastacks at the Yaquina Head Lighthouse can be a challenge (light-colored only when coated in dry bird guano!). When the rocks are storm-scrubbed and wet, they put a black cat to shame. This weekend, there was a mighty wind storm with dark, wet skies on the Oregon Coast. I was afraid to bring my shutter speed down below 1/60 because the wind buffeting me would have caused camera-shake blur. Still, there was a bit. The negative wouldn't hold up to much enlargement. Last year, on almost the exact some date, I photographed the same seastack from up on the cliff with a Pentax 645 on a tripod (left). At f/8 (my default aperture) the shutter speed was probably 1 second. Dry weather and adequate exposure allowed detail to creep into even the north-facing side of the rock. In addition, a 645 negative has 2½ times the area of a 35mm negative, so the enlargement potential is greater. The tradeoff is flexibility. With a small camera, it didn't take any time or effort to run down the stairs to the beach and get as close as safe to the water. Needless to say, modern photographers take that for granted, but when I'm time-traveling, I operate under the rules of my spatiotemporal location :-). |
|
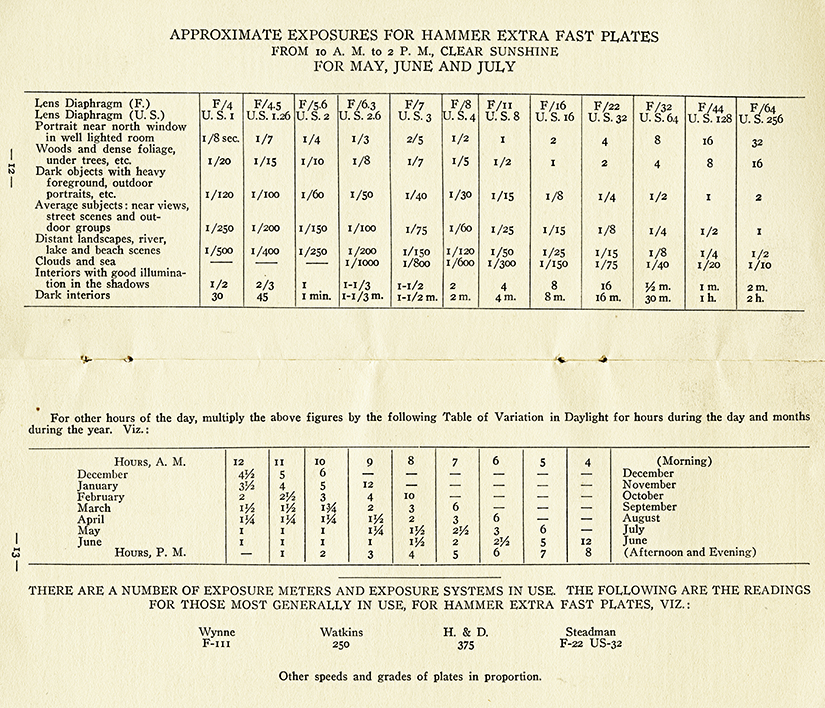
From HAMMER"S LITTLE BOOK — A Short Talk on Negative Making, with Many Helpful Formulas, c. early 1900s: |
|
|
By my estimation, "Extra Fast Plates" were ISO 64, give or take, in the middle of the day in the middle of the summer — actually, quite impressive. Hammer's Little Book is a nifty publication. You can read the whole thing here: http://www.thelightfarm.com/Map/Booklets/BookletsPart1.htm |
Successful handheld photography on low UV days |
|
Happy Holidays of Joy and Peace to One and All. |
|
November 19, 2015 |
|
See you on New Year's Day! |
|