Emulsion Geek #2: Anti-Halation Backing
April 28, 2011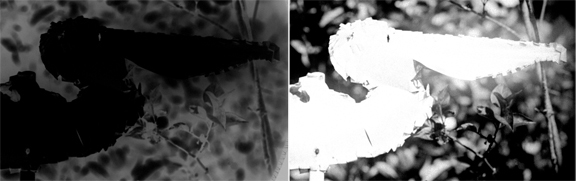
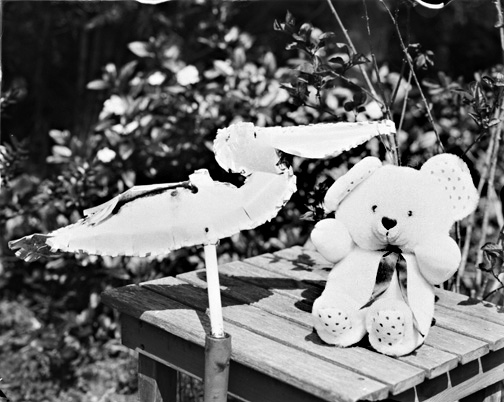
This past week I put the latest version of 'TLF#2' on 4"x5" glass plates for some testing I've been procrastinating. (Honestly, I'd rather play with cameras!) While my inner-adult was temporarily in charge, I took a look at halation control, contrast control with D-23 developer, and a dye soak for ortho sensitizing. First, anti-halation backing.
I love halation under certain circumstances, but halation does reduce the detail in highlights and in excess it can be distracting. Regardless, it's always nice to have a bit more control of our process. The mechanics of halation are pretty straightforward, and luckily, so is a solution.
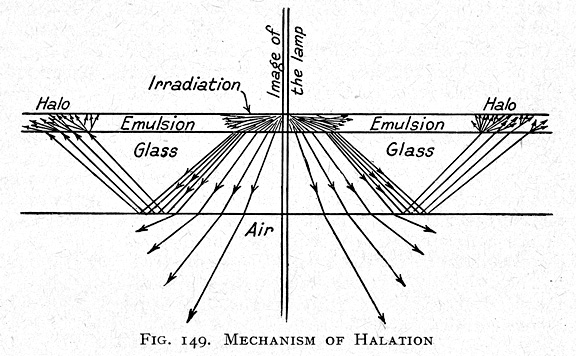
Photographic Theory — Theory and Practice, Being An English Edition of "La Technique Photographique" by L.P. Clerc, 1937 (1946 reprint) p 159.
Clerc's diagram nicely illustrates halation and hints at the solution — preventing the light passing through the plate from bouncing at an angle off the back surface. Modern films accomplish this with appropriate dyes, which either wash off during processing, or have no effect during printing.
I've read, but not yet tested, that collodion painted on the back surface works well, and I'll try it the next time I make film. For glass plates, Baker, in his booklet, Successful Negative Making, p 15, (readable on TLF's literature page) details an anti-halation recipe. Trusting Baker, I'm sure it works well, but for my purposes one of the oldest original solutions to halation has proved simple and very satisfactory — black backing paper.
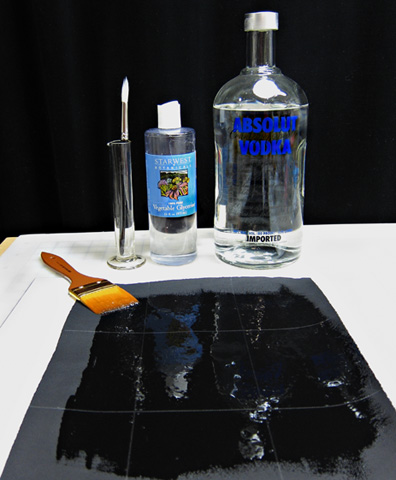
Tools and Materials:
- Paper: Black Hahnemuhle Ingres, 95 weight. Daniel Smith
- Brushes
- Vegetable Glycerine ('Starwest Botanicals', or similar, available at natural foods stores)
- Vodka
Procedure:
Lay out the black paper on a waterproof surface (I favor a mylar print bag stiffened with a piece of mat board.) With a pencil, outline sizes to fit your plates (plate size minus 1/8-inch, width and length.) Tip: Leaving at least an inch around all the edges makes handling the paper a lot easier. Squeeze some glycerin over the paper. (Drawing a big smiley face with a fat nose seems about right!) With a wide brush, work the glycerin over the entire surface, minus the edges. The important point here is to make sure all the area to be plate backing is covered in glycerin. Keep working the glycerin across the paper for a couple of minutes. The paper will start to buckle. Don't try to smash the buckles down. They'll work themselves out. Let things sit for about 15 minutes then add a little fresh glycerin and work that across the paper. Turn the paper over and work in the glycerin that has soaked through.
Now, it's basically just a matter of repetition and observation. At some point, it will be obvious that the paper has soaked in as much as it's going to. The surface will be completely flattened out and the original high gloss will be a nice, even dull sheen, without patches of either gloss or dryness. I left my sheets out where I'd pass by them throughout the day, and gave it a turn and coat each time. It fit seamlessly into a work day. This is definitely one of those things that takes far more time to talk about than to do.
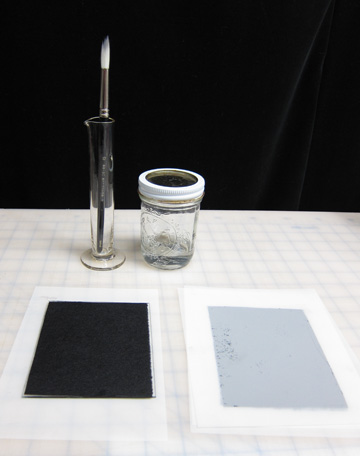
Blot any excess glycerin on both sides with a clean paper towel. Cut out the backing sheets with a scissors, and interleave them with mylar or Yupo. The paper has one side that is smoother than the other. Choose the smoothest side to face the glass. When it's time to back your plates (coated plates, dry, with the backs cleaned of emulsion run-over, and of course, in safelight conditions) carefully position a sheet of backing paper on the back of a dry plate. Be careful to keep one hand clean and cotton-gloved for holding the plate by its edges and one hand for handling the sheets. With a finger, gently press and smooth the paper into close contact with the glass. If the paper seems too dry to adhere, refresh it with a quick brushing of a solution of half glycerin and half vodka. This refresher solution will keep indefinitely in a sealed glass jar. Tip: A couple of tries and a little observation will be necessary to determine the exact moisture level that is optimal for your conditions.
Load and shoot the plates as usual. The only trick from this point on is to remember to remove the backing paper before the plate goes into the developer. The papers can be used over and over again, as long as they are stored separated by plastic and if they are refreshed as needed.
[Caveat: I haven't kept the plates loaded with the backing paper for any length of time. I don't know yet if there are problems with long-term storage.]
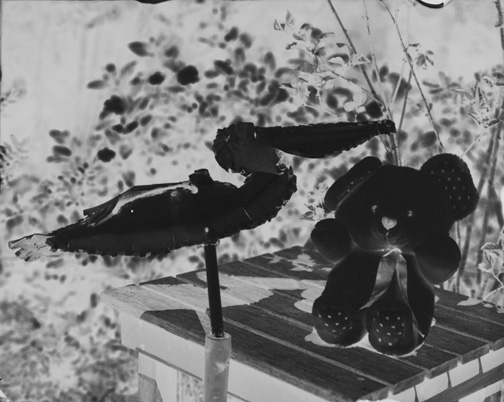
Halation elimination (or, at least, serious reduction.)
This plate was exposed 15 minutes later and processed identically to the one (cropped) at the top of the page, except for the addition of an anti-halation backing sheet.